The differences between Basic, Full and Overbend Custom harmonica (and let's talk about screws)
I'm talking about the similarities and differences between the different types of my Custom harmonicas.
I'm talking about the similarities and differences between the different types of my Custom harmonicas.
Don't stress out about all the numbers! I just got asked a question about how to tune a harmonica "correctly" using 442Hz and offsets. Here's my answer:
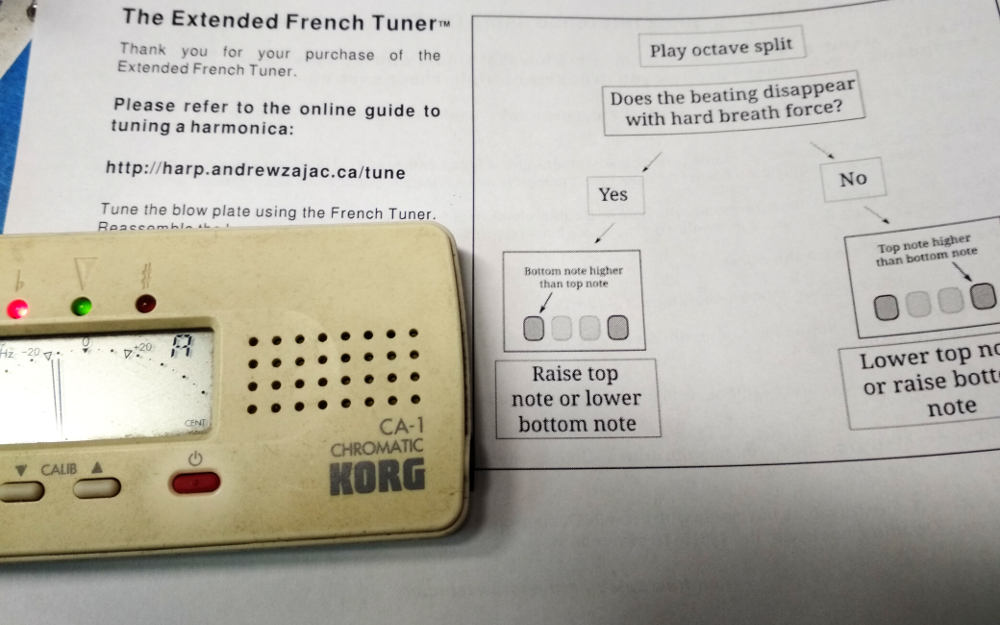
Don't worry so much about tuning "correctly" when trying to wrap your head around all the numbers (443 Hz, 442, 439, etc...) Know that harps that are tuned to Equal Temperament at the factory are usually tuned with an accuracy of + or - 6 cents! That is a very large margin of error. We only need more accuracy when we want the chords to sound in harmony (as in "harmonica").
Let your ears decide. Play single notes and play chords. If something sounds not right to your ears, you have the means to fix it. Play various pairs of notes and figure out which note(s) is/are the culprit. Then use "the numbers" and your ears to fix them. The "numbers" (offsets) are a tool to *help* you make the harp sound right. But it doesn't work the other way around. There is no expectation that you need to validate the tuning of a harmonica by looking at a number on a tuner. Single notes on harmonica are so unstable that using that method is very inaccurate. Just play it and if it sounds good, success!
Tuning by numbers as I describe in the tuning sheet you got is a quick way to do things. You will not achieve perfect accuracy using numbers alone. You need to use dynamic breath force while playing two notes at the same time and let your ears guide you. The methodology to do that is on my website and the link is in the documents that came with the tools. There is also a breath chart on the sheet.
The numbers do serve as a landmark to get you close. It's generally a little easier to set the tuner calibration to 339 and tune to make the needle aim for the zero mark instead of leaving the calibration at 442 and tuning to -12 cents. That's why I recommend changing to 339 Hz when tuning major thirds. Fifths are only about two cents sharp so somewhere in between 442 and 443. But we will hit the 2 draw a little harder so it's maybe best to tune it a little sharp, hence tuning the tonic of the draw plate to 443 instead of 442.5. Also, since those reeds are on the low end of the harp, we naturally tune them a little sharp anyway so the 3 blow may indeed be tuned to 443 anyway once you are done.
I hope that helps! Let me know how it goes!
The Hohner Marine Band is the reference-standard, classic diatonic harmonica. It has gone through a few changes over time, but it is still the same design. It uses a Pearwood comb and brass reeds that have that classic sound and response.
Vintage Marine Bands were excellent instruments. Some of the best classic harmonica records were made using the Marine Band.
Some pre-war versions of the Marine Band are sought-after by collectors. Up until the late 1970s, the quality was excellent. Hohner experienced a few years of poor quality in the 1980s and early 1990s. They attempted some money-saving strategies which were poorly-received. Quality rapidly improved in the late 1990s as they re-tooled their shop.
When buying a vintage harmonica, how do you know if is was made during the good years (before the late 1970s and after the late 1990s)? Will it be worth the time invested to fix it up?
You can look for a few clues as to how the Marine Band was assembled like the number of nails on the bottom side, you can look at the address on the cardboard box, the color of the blue ink on the box.
But these clues don't apply to a Golden Melody or some other models of a vintage Hohner harp?
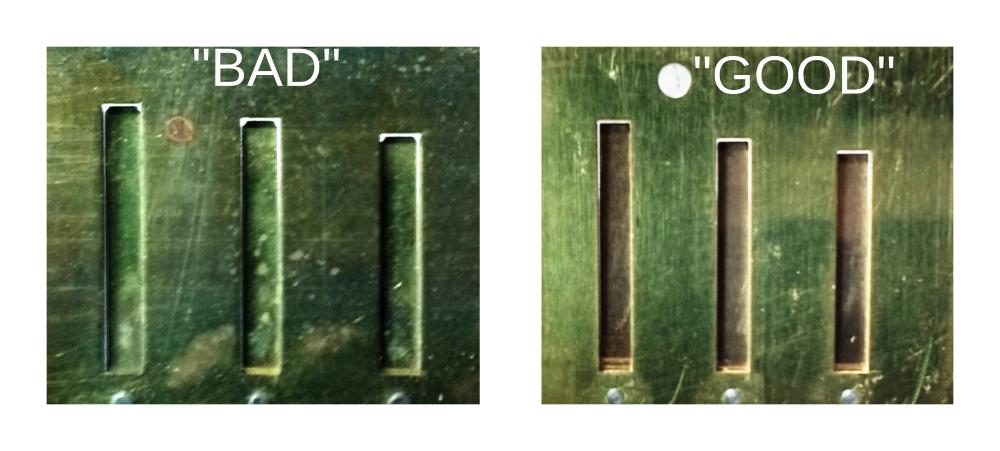
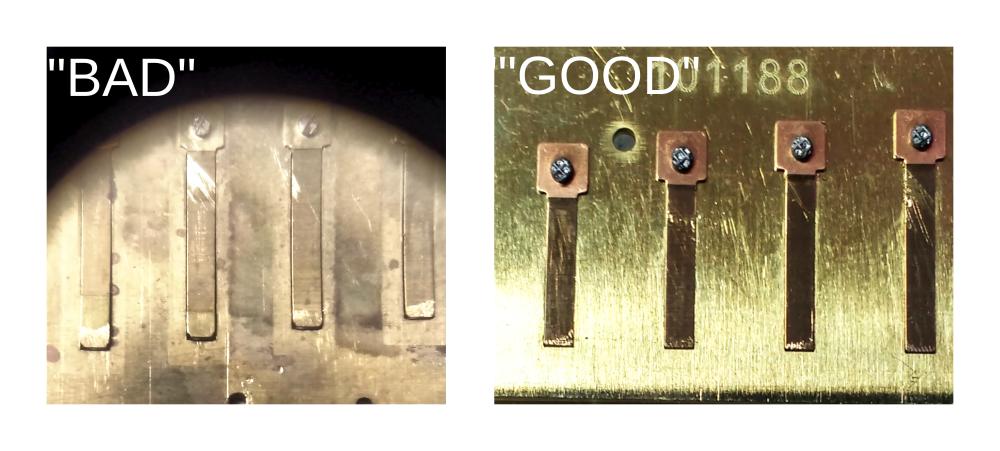
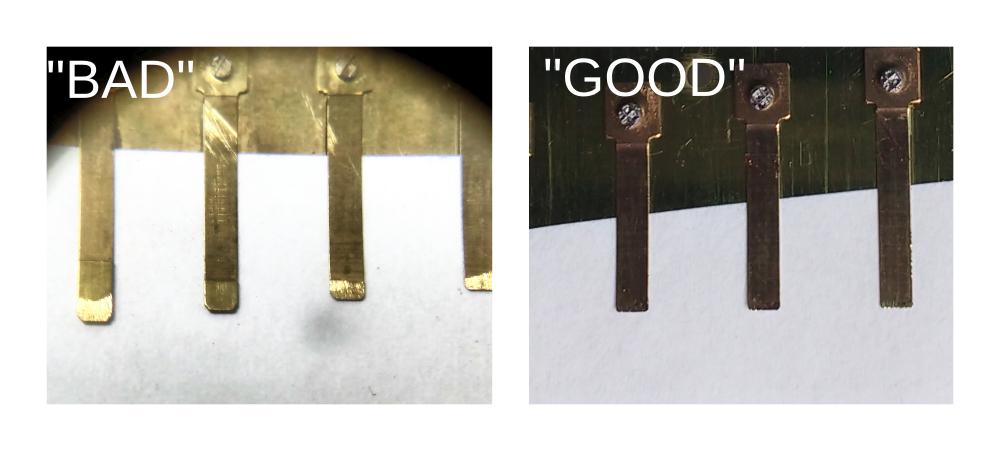
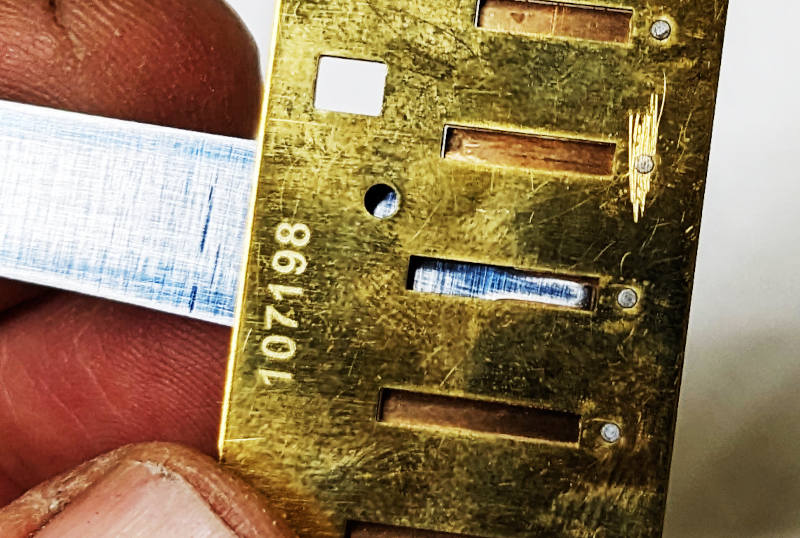
A sure-fire way to tell is to look at the reeds. This works for every model of Hohner harmonica.
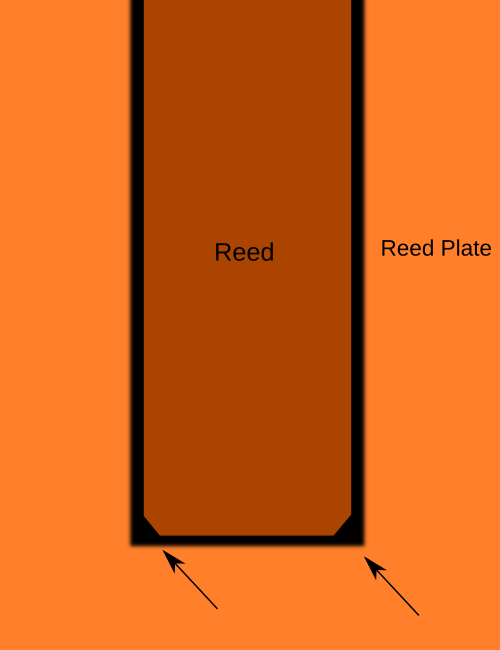
The tips of the older reeds from the "bad" period are chamfered or rounded.
 Click on the photo to enlarge.
 Click on the photo to enlarge.
 Click on the photo to enlarge.
If you are considering spending some time restoring or re-tuning a vintage harmonica, make sure the reeds are *not* rounded at the tips.
A harmonica from the "bad" period will take a lot of time and effort and yet still not ever play well. Be warned and don't waste your time.
Some of those old harps were held together with brass pins instead of screws. Here's a video on a neat way to get those pins out. You can tap out one side with an M2 tap and enlarge the opposite hole with a 3/32" drill bit for clearance and re-assemble with an M2 screw.
These videos are available as a 650 Meg download from this site or as or a USB drive from my USA dealer Rockin Ron's.
This is a new collection of quick videos made for the reluctant customizer.
These videos are for players who HATE to work on their harps and learn best from a "show me how it's done" approach.
Every harp player should know about repairs and upgrades. These two-to-three minute videos will help you get the most out of your harps in the very least amount of time so that you can get back to playing.
It's not easy to capture exactly how I see things as I customize an instrument. The techniques and ideas are very clearly demonstrated which means there are moments in these videos where the lighting and contrast change very quickly.
I did not do a lot of post-production work to make these videos look nice.
Total viewing time: 31 minutes.
These videos are intense and move at a quick pace. They point you in the right direction without spending hours going over all the details because harmonica customizing and repair is a hands-on craft. Although aimed at the reluctant customizer, experienced harmonica service providers will benefit too from the concepts shown in this collection of videos.
The videos:
1- The Assessment - What makes a great harmonica great? You can't fix what you can't see: Is there a way to measure how great a harp is? Yes.
2- Break in and break open - What does it mean to "break in" a new harmonica? How to take apart and put back together a harmonica. What's a reed wrench and how do I use it?
3- Flattening the draw reed plate - This is the simplest and quickest way to give any harmonica a powerful boost.
4- Flattening the blow reed plate - Let's solve this mystery: How do you do it if the reeds are in the way?
5- A flat comb - Make all the parts of the harmonica become one for best tone and performance. Smooth and shiny doesn't mean flat. You can skip this step by getting one of my Dark combs™.
6- Correcting factory defects - These defects make you work against yourself. Once you learn to find these problems, you will save HOURS of frustration by eliminating them right off the bat.
7- Simple reed work and gapping - Gapping sometimes doesn't help enough. Go a little beyond gapping: Don't just gap the tip of the reed.
8- Better reed work - What does it take to get peak performance from a reed?
9- Embossing and chamfering - Why (and why not) to do this?...
10- Reed replacement - You can do this. And once you master it, it's a whole new ballgame!
11- Tuning - Spend a few minutes and take full advantage of what the instrument offers. Harmony is power. Your audience knows when your harp is out of tune. You also get to see how the pros do it. Tune with accuracy that will last.
GUARANTEE
- Apply the ideas in these videos and you will save money by upgrading and repairing the harps you already own instead of having to buy new ones.
- Unlock the hidden potential in your harps and make playing more FUN. In many cases, the improved response, tone and pleasure from your instrument will help you become a better player.
- You will get answers to any questions you may have around the topics in these videos. Support is included, ask me personally.
Help documents and charts are included.
These videos are available as a 650 Meg download from this site or as or a USB drive from my USA dealer Rockin Ron's.

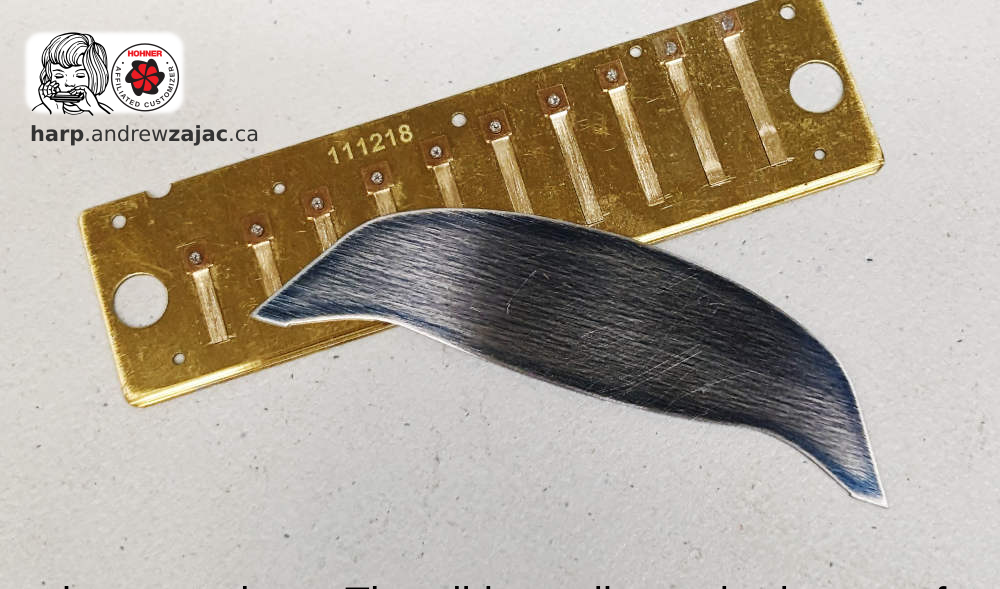
Reed support tool and plinker
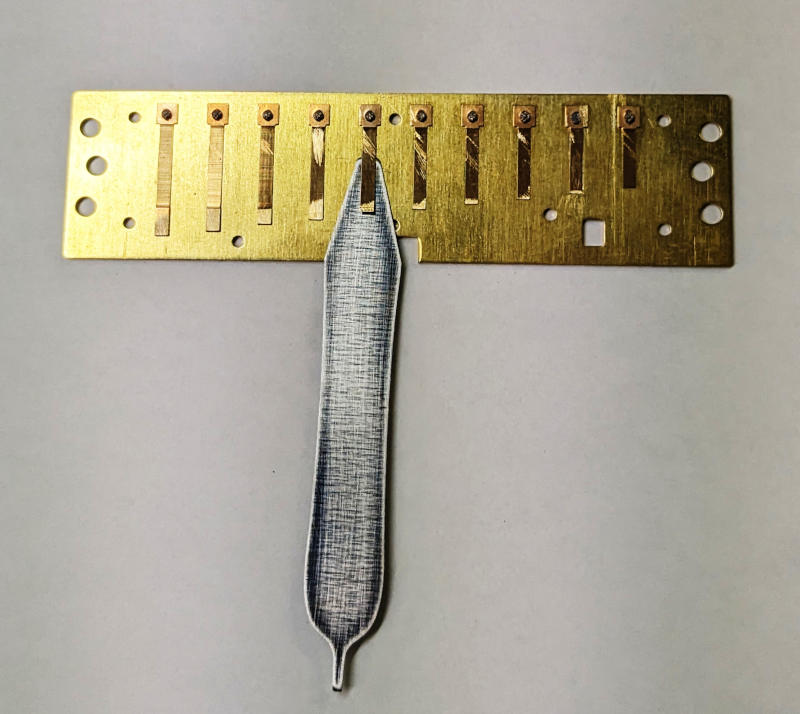
This tool has tips that have been carefully prepared using a five-step process. It will get under even the most closely gapped reeds.
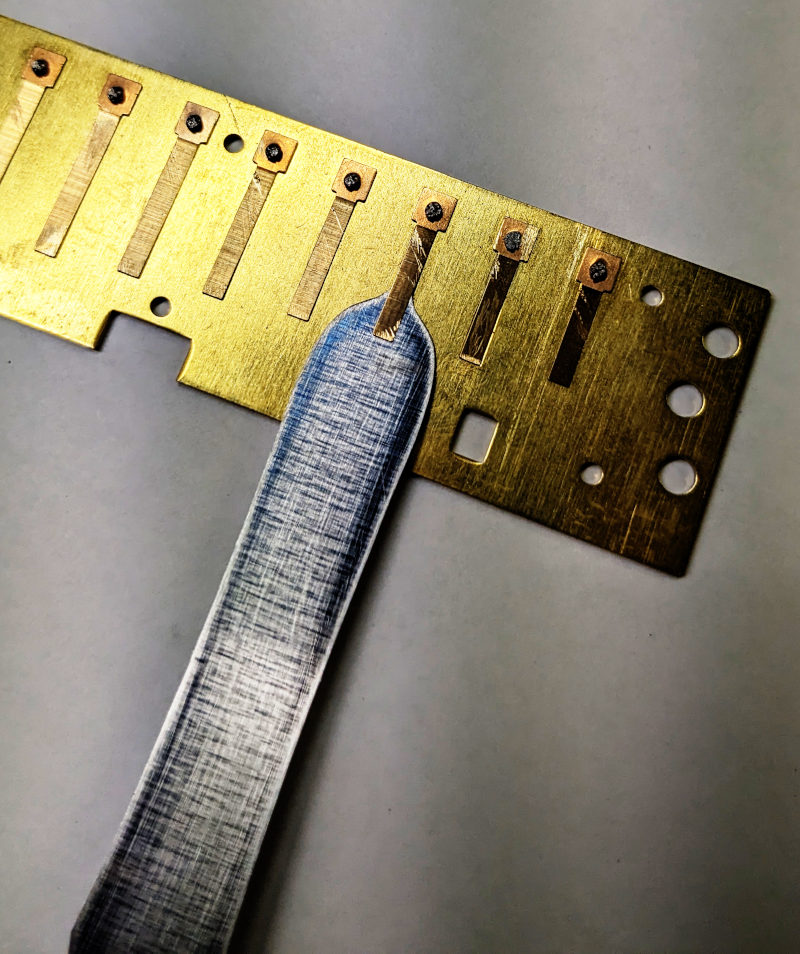
Advance the tool at a sharp angle to get under the reed.
The tail supports a reed while tuning. Use the tail to support the blow reeds while they are still on the comb. Support the reed when lowering the pitch by advancing the tail to the back wall of the slot.
This will ensure you do not bend your reeds out of shape as you tune them.
Use this tool along with the brass reed tools to shape your reeds, too.
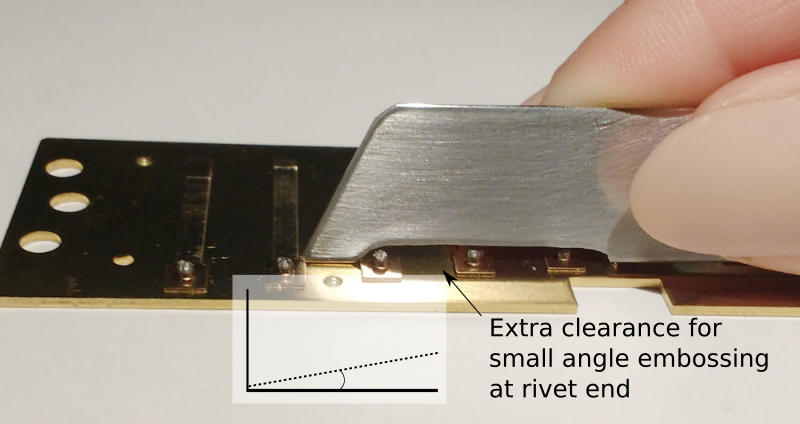
Embossing tool
(New version 2021-06!) This tool is made from tempered high-carbon steel and both tips are finished by hand. The tips are carefully sharpened to the correct specification to allow it to emboss the slot effectively without shredding or otherwise damaging the slot. I ensure that each tip is perfect.
Embossing increases the efficiency of the reed as it goes through the slot. By using a tool to press down onto the edges of the slot, a small ridge of metal is created in the slot. This ridge decreases the space between the reed and the slot. The closer tolerance will cause the reed to make more sound and require less breath force to activate.
To benefit most from embossing, you need to emboss the entire slot. For a quick shortcut, see these instructions on only embossing half of the slot.
Full-length slot embossing can be easy! The embossing tool is effective on stainless steel as well as brass reed plates. I recommend using a mineral oil when using this tool. If you over-emboss a slot, the presence of oil also speeds up the process of plinking and clearing away burs.
The tool is made small because embossing is more about precision than force. Apply pressure with your fingers instead of the weight of your arm and you will save time and have a lot of success.
The tool can be groomed with some fine sandpaper once in a while to keep it in working order for a very long time - at least several hundred harps. You won't have to worry about wearing it out.
Free download: Embossing instructions:
(Note: The old version of my Embossing tool is shown in the video.)
Click to download full-slot embossing instructions (PDF file)
Embossing takes practice and you need to know how to check the work you are doing. Here is a YouTube video on how I emboss. In it, I show you a few tricks to make sure you are doing quality work.
I offered some Mysterious Embossing Instructions which included a clue you can download and print out.
This next video explains the clue I gave, my reason for offering it in this way and a demonstration of how I use indirect light and a three-dimensional view to make quick and effective work of embossing harmonica slots.
With this method, you get benefits similar to using a microscope and a light-table but avoid the respective disadvantages and limitations of those devices.
Even more information!
Here's some more information about improvements I made to this tool a few years back.
(Video number three!)
This is the third installement from the Q&A responses from Facebook. I am grouping these questions by topic, not chronological order. Some questions relate to one another and make for a nice stream of ideas when answered together.
Extensive videos covering these and other topics are found on my USB videos:
Andrew's videos on USB
(Video number two!)
This is the second instalment of answers from the Facebook Q&A responses form two weeks ago. I am grouping these questions by topic, not chronological order. Some questions relate to one another and make for a nice stream of ideas when answered together.
Extensive videos covering these and other topics are found on my USB videos:
Andrew's videos on USB
Two weeks ago, I asked you via Facebook for your questions for a Q&A session. I got so many wonderful questions, thanks! I can't answer them all at once so here is the first instalment. I am grouping these questions by topic, not chronological order. Some questions relate to one another and make for a nice stream of ideas when answered together.
Extensive videos covering these and other topics are found on my USB videos:
Andrew's videos on USB
This is an older video and it's become a little hard to find on my website as I have added content over time.
It's nonetheless a very important video. Here is an easy, low-tech way to "uncover" the secrets of advanced reed work and embossing.
Reed Work
In the second half of the video, I demonstrate some reed work techniques. When it comes to reed curvature, there is a lot of confusion about what a well-shaped reed should look like.
It must be straight as it passes through the slot but that doesn't mean it needs to be straight at rest. A harmonica reed will usually be curved at rest so that as it flexes it becomes straight at the very moment it passes through the slot.
The reed is dynamic; its shape changes as it swings. That's why The Grip is so important. It allows you to see the reed's shape at the very moment it passes through the slot.
From 2015:
"Shape your reeds, do embossing and troubleshoot weird sounds by getting a good look at what your reeds are doing. Use this method to perform some delicate tasks without the need for a light table or a microscope. All you need are your eyes and a bright piece of paper.
I've mentioned this method before as part of at least two other youtube videos. I thought I should make a video to focus on this particular technique as it is applied to reed work, reed alignment and embossing."
To have success at customizing the diatonic harmonica you need to be able to rebuild the instrument from the ground up. If you are comfortable with this idea, you will be able to handle any problem that is thrown at you.
I reference this video where Joe Filisko talks about the Hohner Affiliated Customizer program (SPAH 2018):
Just about everything you do to a harp affects the tuning so it stands to reason the last thing you should do is fix the tuning. But how do you make adjustments to the tuning without messing up the shape of the reeds or undoing other hard-earned adjustments?
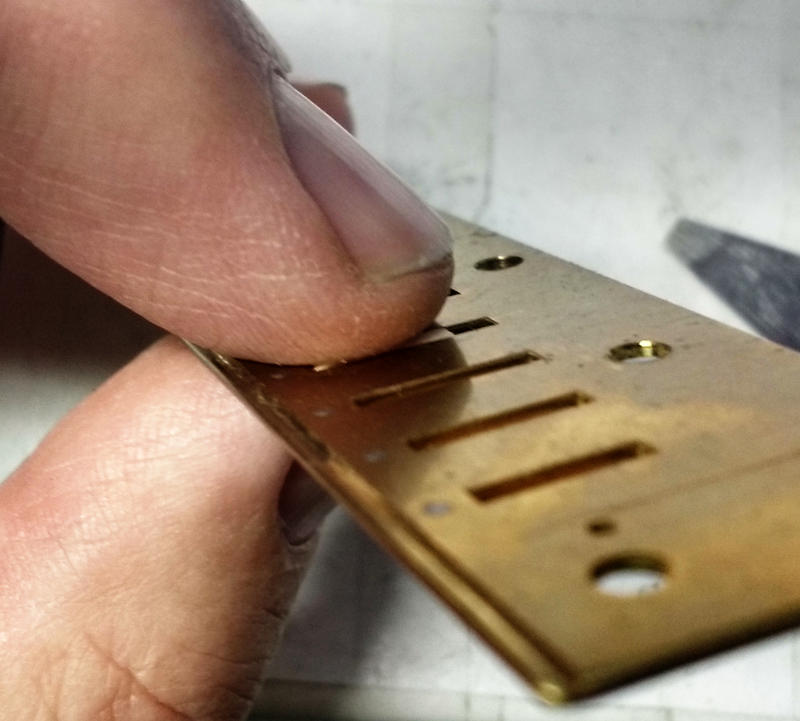
Here is an idea to support the base of the blow reeds while you lower the pitch with a quality file. You can support the reed using a piece of toothpick or 18 gauge copper wire. Use anything else you think might work.
We usually support a reed to lower the pitch using a plinker/support tool. We can't advance the support tool to the very base of the reed because there is no room and we would bend the reed out of shape if we force too much.
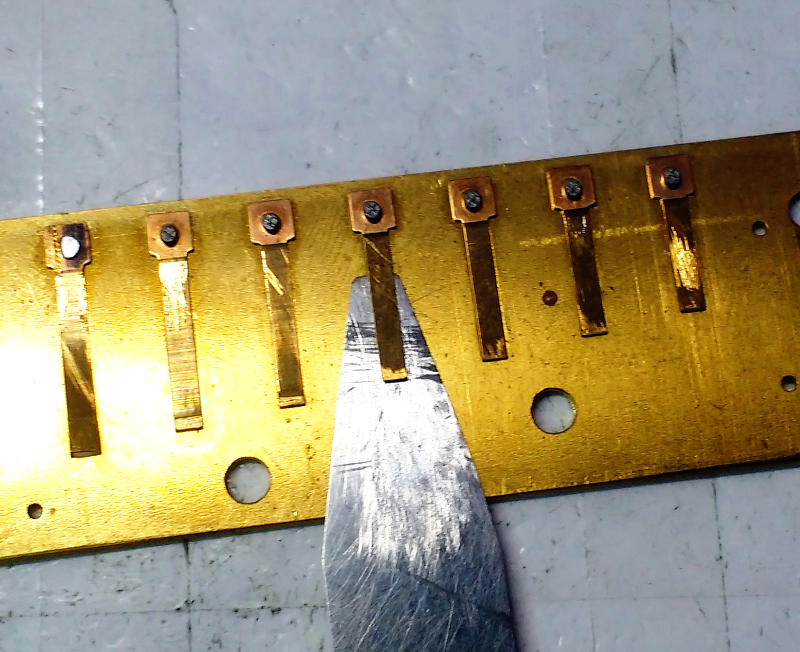
On the outside of the reed plate you can place something to support the reed and it can go all the way down to the base. Here's a small piece of toothpick:
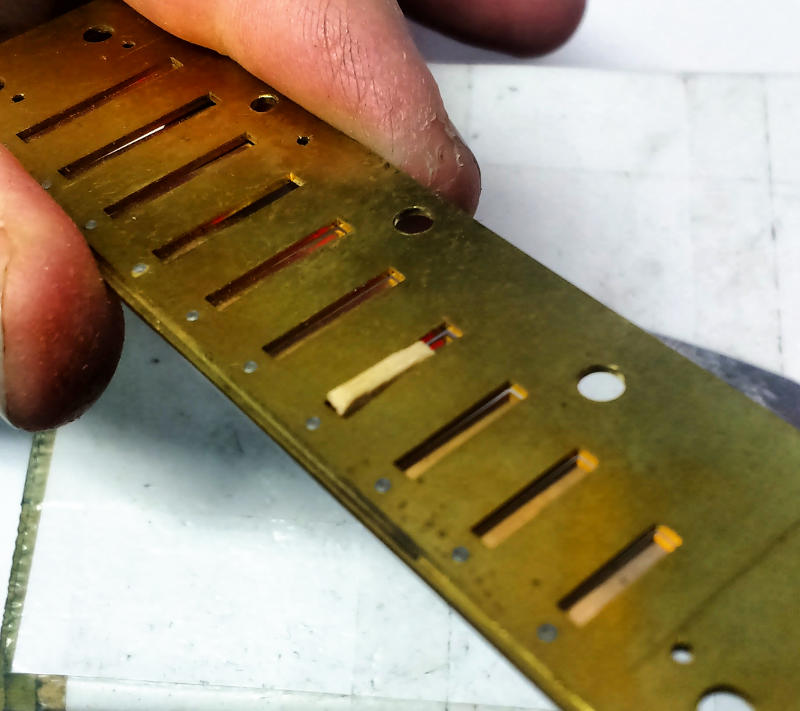
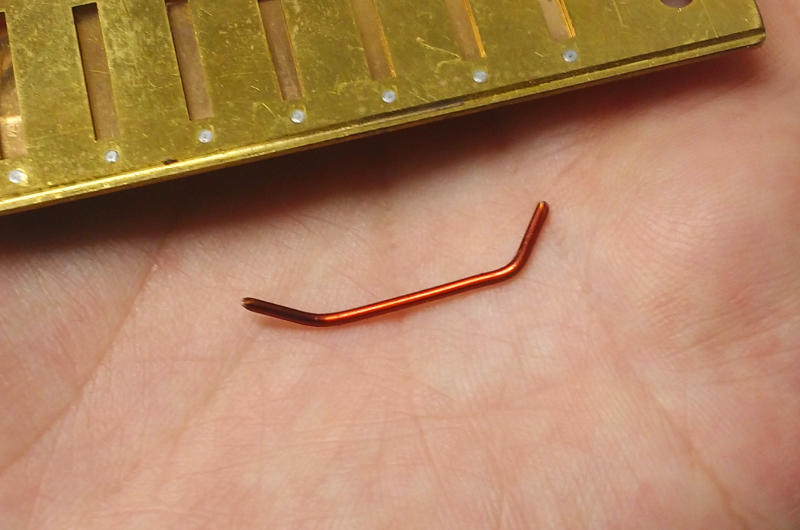
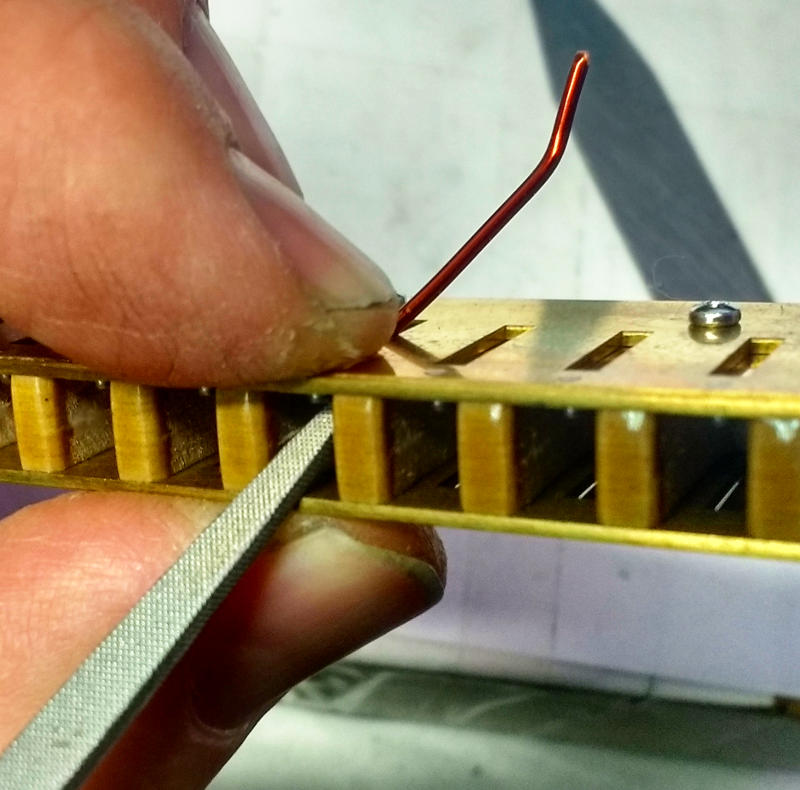
Here's a piece of 18 gauge copper wire bent in the shape of a hockey stick (It actually has two bends in it to suit different reed lengths as well as to make it easier to pick up with my fingers):
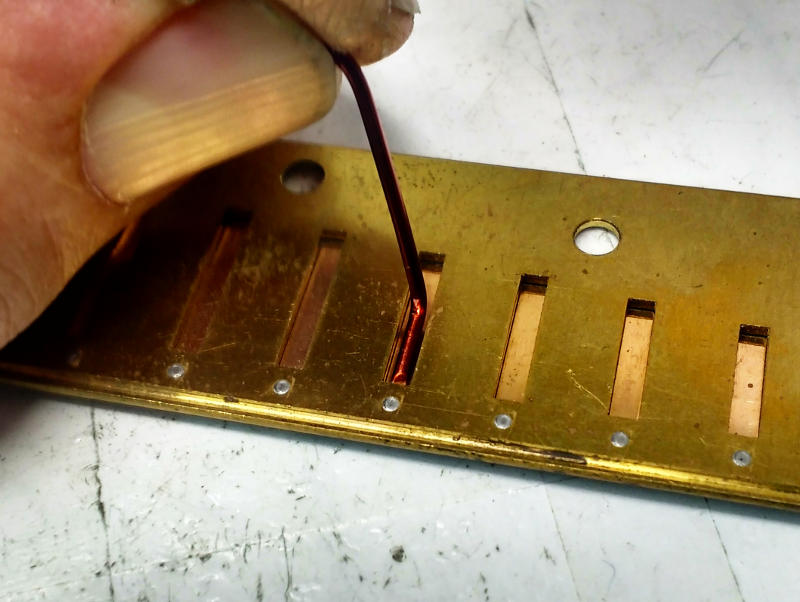
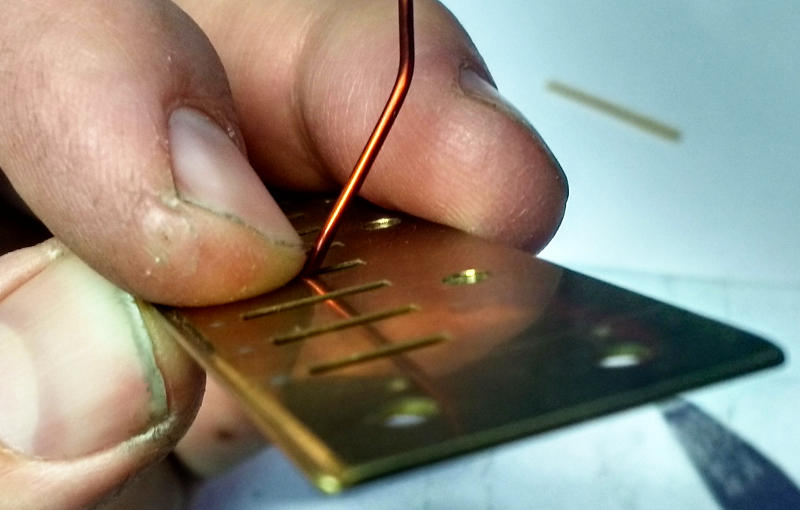
It's just a matter of filing the base of the reed from the inside of the channel with a good quality file:
"I don't know what I don't know!"
Send me a harmonica you have worked on for assessment. I can give you pointers and an action plan on how to get your results to the next level.
You can't find a problem unless you know where to look. I will give your instrument an objective 30-point assessment and tell you where to focus your efforts and improve your trouble areas.
You don't have to be a harmonica-service provider or repair tech to use this service. If you are a harp player who enjoys repairing and working on your own harps to save money but are stumped and can't seem to get the results you want, I can help you.
This service is aimed at those who have purchased my USB videos and have applied the ideas but it is also open to all others (an extra charge applies.)
___
- I will only accept professional-grade instruments. I will not accept any instrument Made In China.
- I will only accept clean instruments. Treat the instrument as though you are working on a harp for someone else.
- For the best possible assessment, I recommend you start from scratch on a brand-new instrument. This is only a suggestion; I realise this may not always be possible.
- I cannot guarantee quick turnover. I can commit to assessing your harp within 30 days of receiving it.
- Shipping costs to and from me are extra and paid by the customer. I will send you a Paypal invoice for the return shipping charge once I have completed the assessment and am ready to send the harp back to you.
Please aim for the following SMART goals:
1. The instrument should look nice.
2. The instrument should feel nice in the hand and in the mouth.
3. The instrument should sound nice with regards to tone and tuning.
4. The instrument should respond significantly better than stock.
___
I will contact you with instructions on how to get your harp to me.
___
What is a SMART goal?
S- Specific: What things make a harp great?
M- Measurable: These things can be measured.
A- Achievable: You can change these things.
R- Relevant: These things contribute to making this particular instrument great.
T- Trackable: You can assess how much closer you are to your goal after making a change.
"Nothing sounds as good as the Marine Band."
This is taken from Facebook Live (with permission) during SPAH 2018. Joe Filisko is joined by Richard Sleigh and Joe Spiers to discuss the Hohner Affiliated Customizer Program. There was some audio interference which caused a very loud and unpleasant sound in a few spots. I did my best to fix the audio in this edit.
More information about the HAC program is here.

Also check out the Summer 2018 Hohner Easy Reeding magazine
Here's a before-and-after look at a reed plate that has undergone customization.
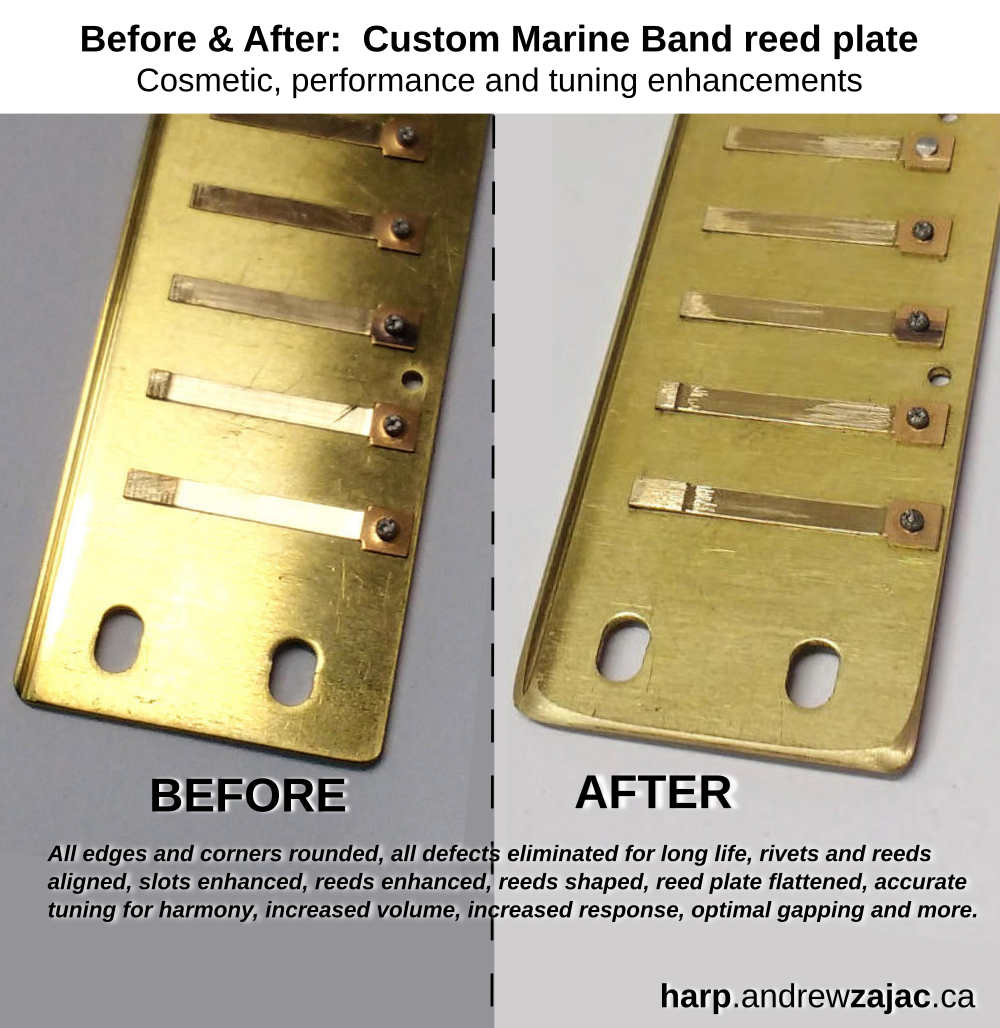
I spend hours rebuilding and enhancing every aspect of a harmonica as I customize it.
I obtain all parts directly from the Hohner factory in Germany. I don't buy pre-assembled harmonicas because the first thing I would do is take them apart. In fact, I even take apart the parts! A custom harmonica is an instrument that has been rebuilt from the ground up.
Copyright © 2025 Andrew Zajac - All rights reserved