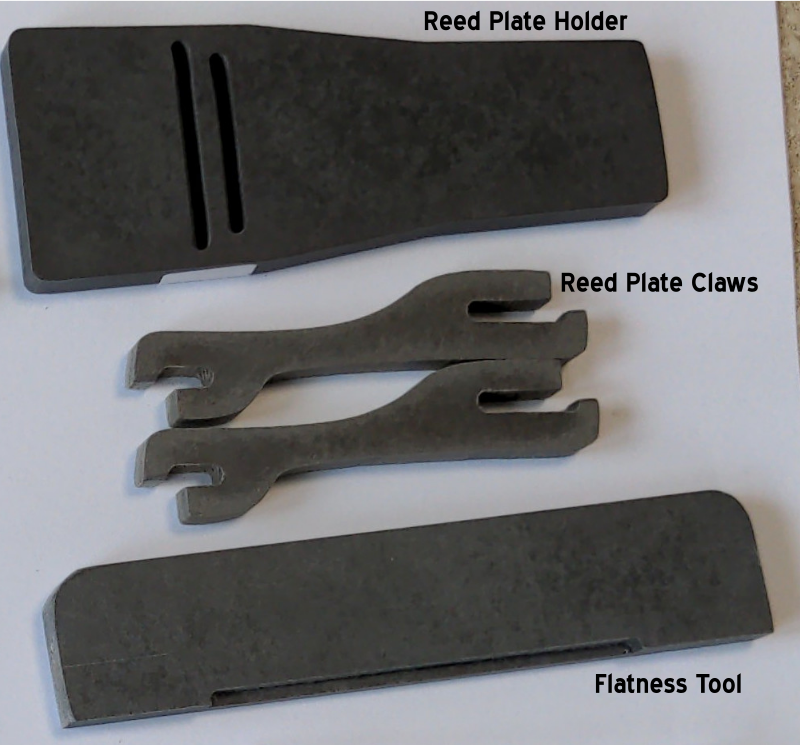
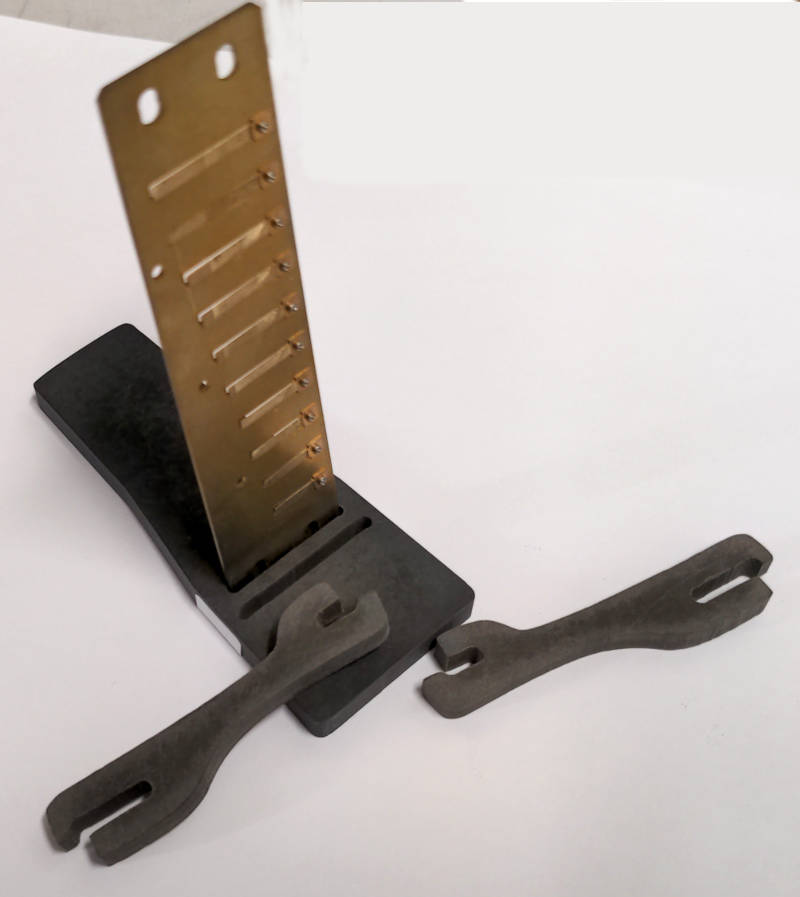
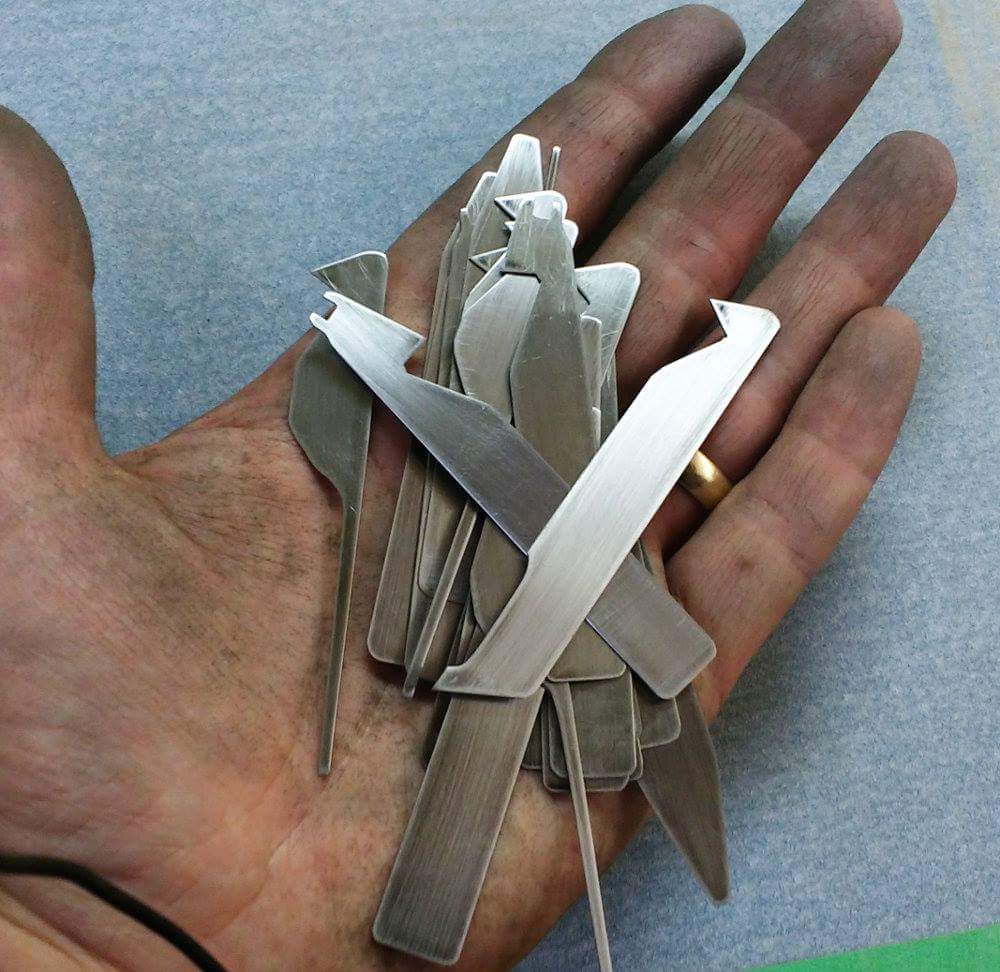
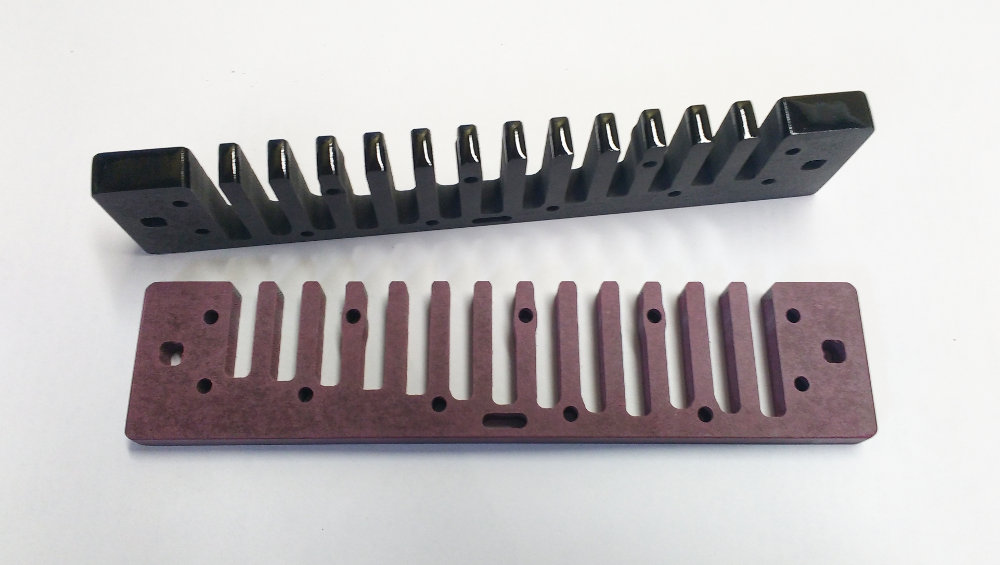
Use these tools to flatten the comb and reed plates.
Straight, flat reed plates fitted to a flat comb are the best framework for the reeds. Even a thousandth of an inch of space between the comb and reed plate means the reed will be less efficient at converting air flow into decibels.
With a good frame, the reeds can function the way they are supposed to. Want even more power? A good frame also means reed work becomes much simpler because all sides of the slot are at the same level and are well supported. A good foundation is mandatory for best results when doing reed work.
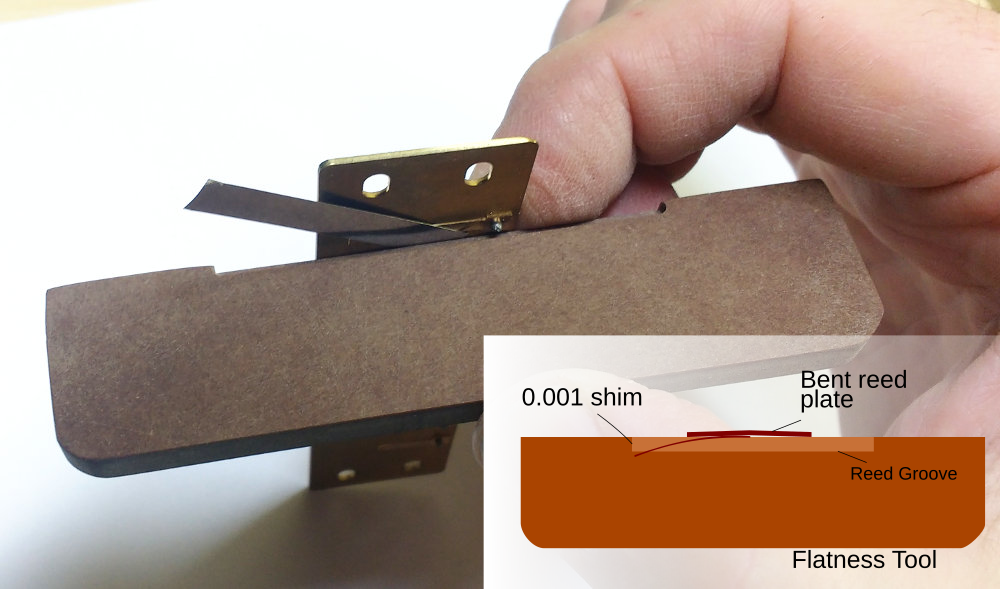
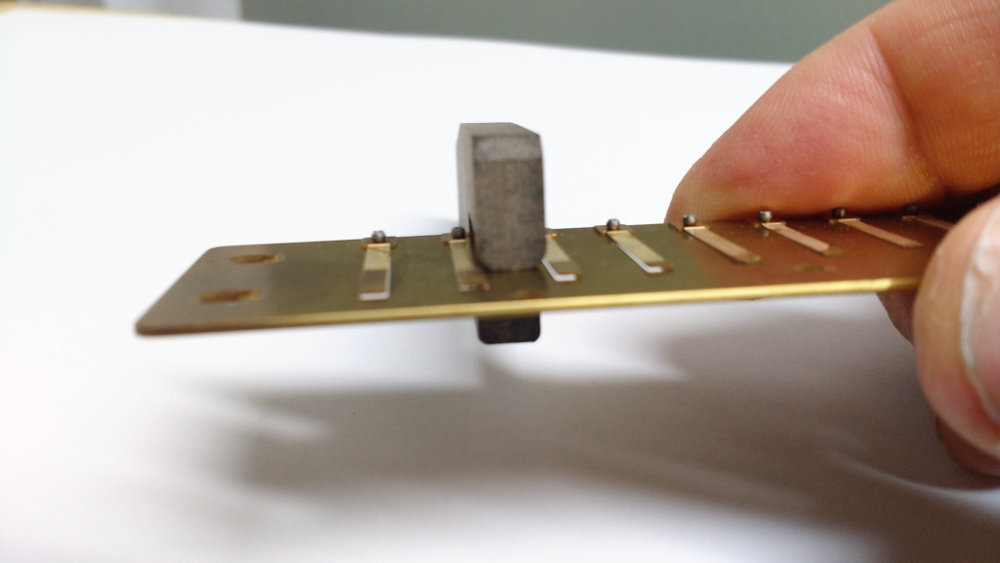
The Flatness Tool™ is used to measure flatness. It is an extremely precise straight edge reference. It has a reed groove so that it can be used on both reed plates as well as the comb. One you find where the comb or the reed plate is not flat, you can correct it.
The Flatness Tool™ can also be used to make combs extremely flat. My method of flattening combs is very easy to learn with a little practice. There is no guesswork involved since you are using a proper reference as your guide.
My Dark combs are the flattest combs on the market. Use this tool to make any other sandwich-type comb just as flat as mine.
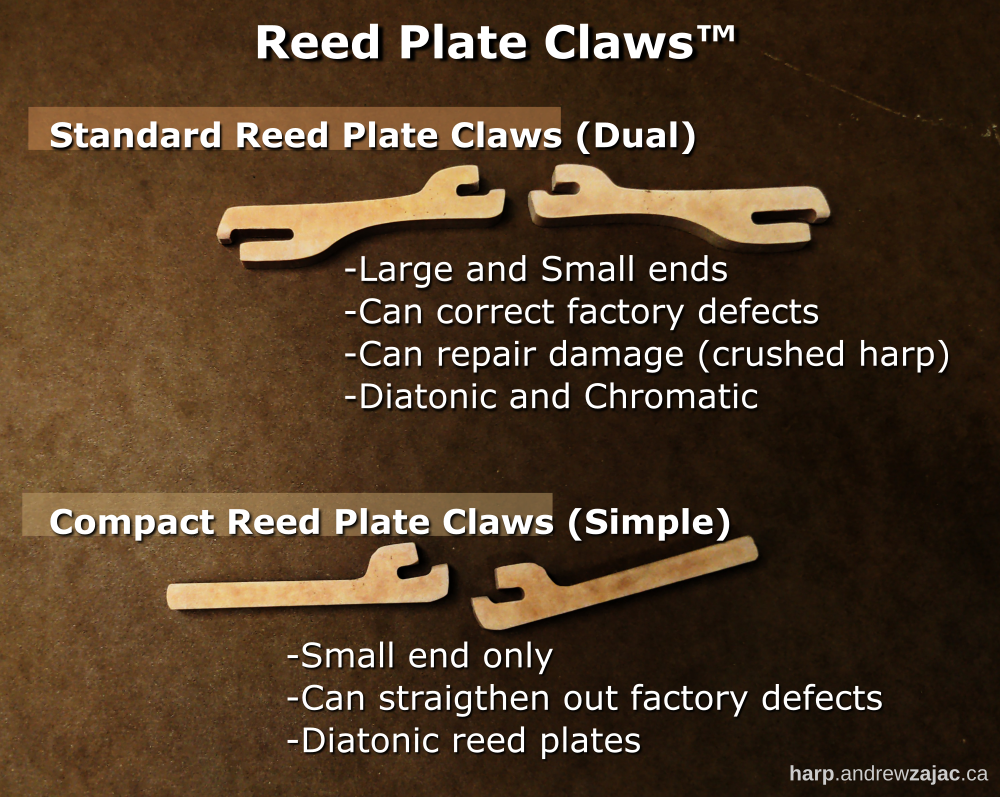
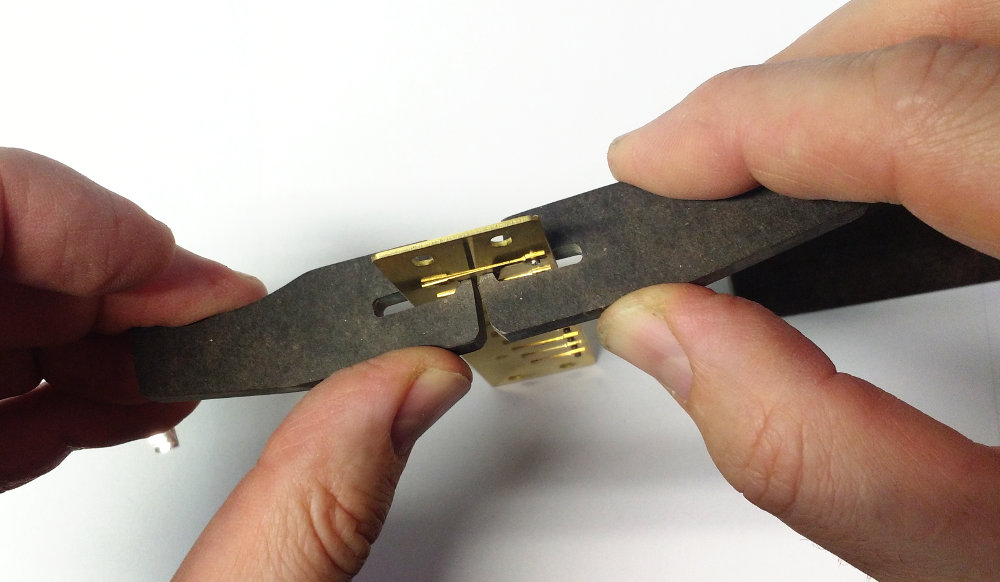
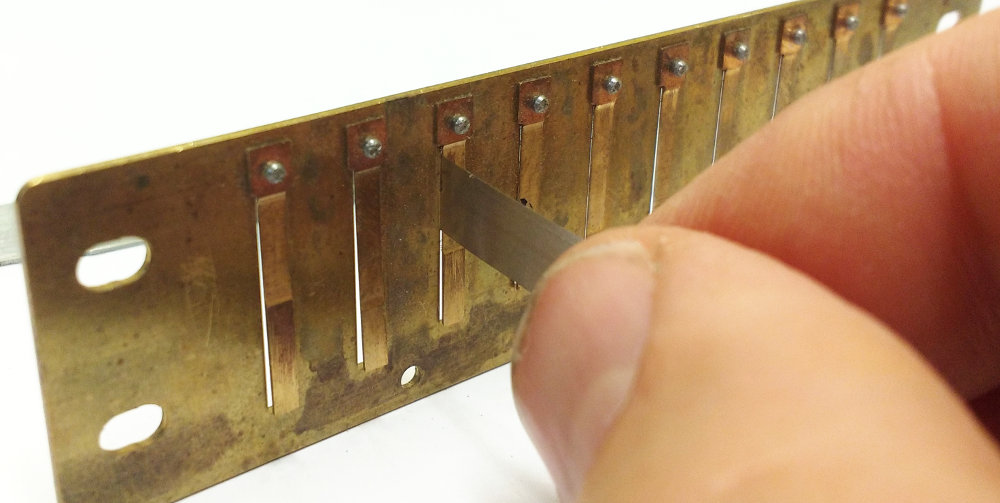
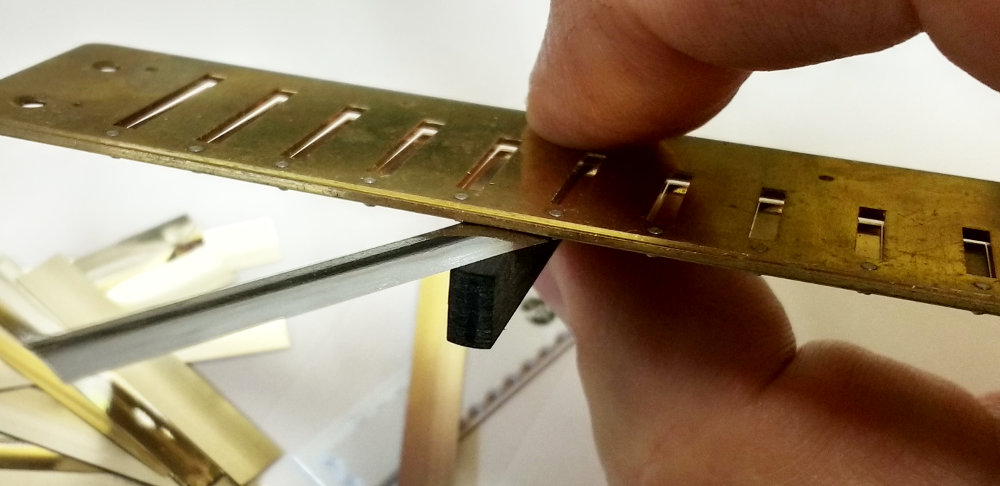
Use the Reed Plate Claws™ on both the blow and draw reed plates. Straighten the draw plate before flat sanding it. On the blow plate, the reeds get in the way of flat sanding so all you need to do is straighten them using the reed plate claws.
The Reed Plate Claws™ are designed to fit safely between the reeds.
Here are the instruction videos:
You may use the edge of a reed plate to check the flatness of the other plate. However, I do not recommend using a reed plate to gauge the flatness of a comb.
You will likely get false measurements which will lead to over-sanding the comb as you try to correct what you believe is a defect. It's not easy to undo oversanding - this type of feedback loop can be fatal.
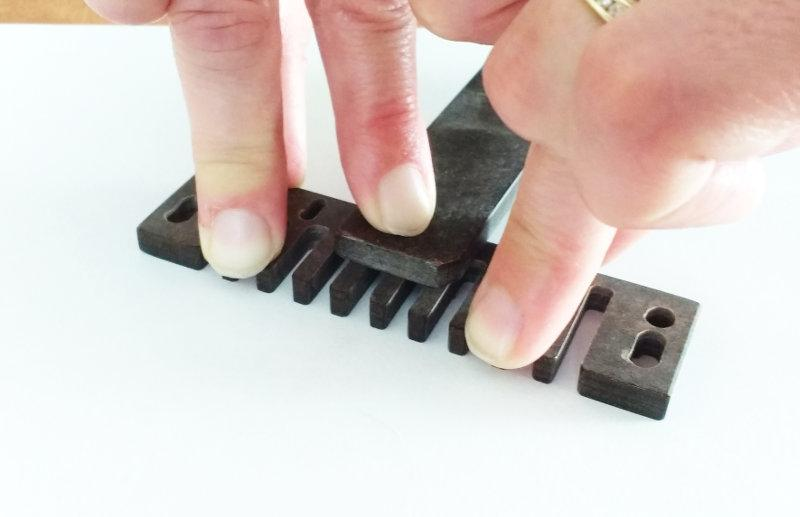
The Reed Plate Holder will help you hold the reed plate steady as you straighten it with the Reed Plate Claws. Once you get comfortable with the claws, you may no longer need the Reed Plate Holder.
It has two slots to accommodate many different sizes of reed plates. Use the smallest
slot that fits.
The Reed Plate Holder ships with a sticker on the under side. The adhesive will help hold the plate in place. Once it loses its stickiness, you can peel it off and replace it with any kind of tape you have on hand. If you no longer need the additional help from the adhesive, don't bother replacing it.
It's a bad idea to tune a harp using only numbers. The exact pitch of a single note played on a diatonic harmonica will vary by a few cents depending on a few things including your breath force, your embouchure and your attitude. So relying on numbers alone is very inaccurate.
That being said, when you are tuning chords to sound in harmony, you need to know where approximately the pitch needs to be so that you can tune each reed to pair up with other reeds using your ears.
Some intervals are more important than others. When dealing with Standard Richter or altered tunings, here is a list of some of the intervals you will have to tune.
Sometime you will want to sacrifice harmony so that the single notes are in tune - this is a compromise as in "compromise tuning".
I can think of three things than help me decide whether to compromise or not:
1- How far away from ET you need to raise or lower the pitch.
2- How close to ET you or the person for whom you are tuning the harp would want each note to be.
3- How much the Just interval in question contributes to harmony (how good the interval sounds).
I have listed how important the harmony is for certain intervals so that it can help you decide which way to go on a case-by-case basis.
If the interval is not listed, don't worry about it and tune it close to ET. Its "Just" tuning doesn't provide any contribution to harmony to be of concern because these intervals will always sound dissonant.
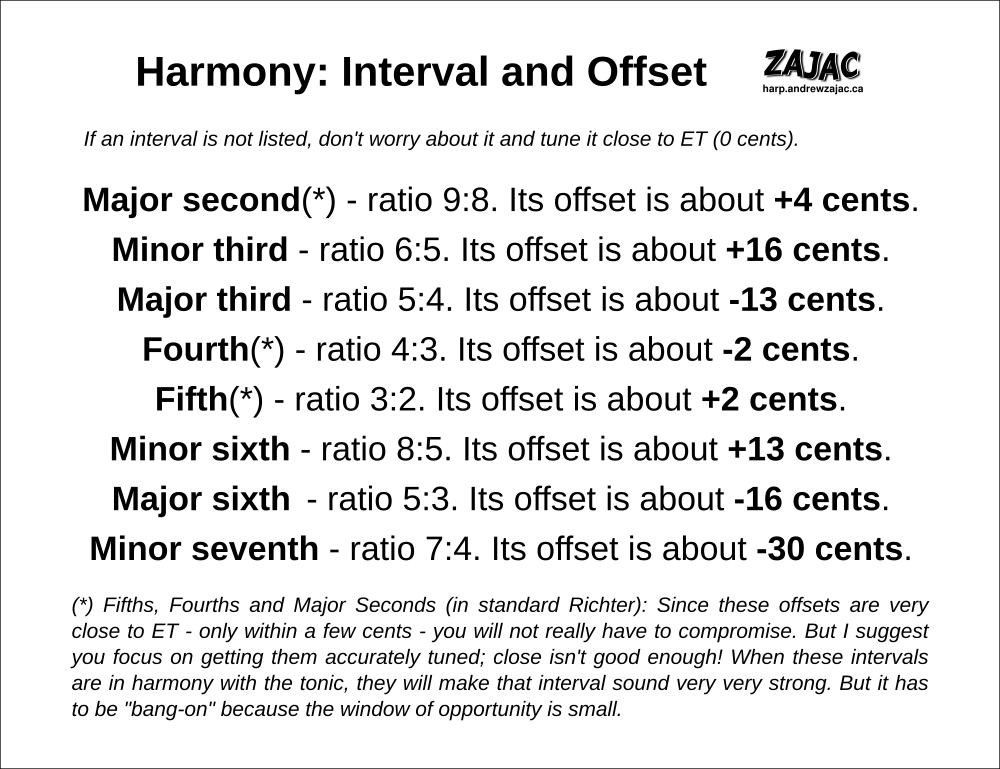
Here is the Interval, the Ratio of the pitch of the tonic to the pitch of the interval, and the Offset which is plus or minus some cents from tuning it to zero on your tuner.
-----
Major second(*) - ratio 9:8. Its offset is about +4 cents.
This interval doesn't add very much to the harmony of the chord so don't worry too much about it. Six draw in Standard Richter is this interval. It's not too important relative to the tonic of the 1-2-3-4-5-6 draw chord (two draw) but it is relevant to the 4-5-6 chord which is a minor third. In that case, the 6 draw is a fifth of the tonic (four draw). Fifths on the other hand, are very important.
-----
Minor third - ratio 6:5. Its offset is about +16 cents.
A minor triad will still sound pretty strong even if the third is tuned to ET so this is not very important. It's a good place to compromise.
-----
Major third - ratio 5:4. Its offset is about -13 cents.
This interval is very important to a major triad. Try not to compromise with this interval.
-----
Fourth(*) - ratio 4:3. Its offset is about -2 cents.
A fourth is the same interval as a fifth but in the opposite direction. So try to not compromise here.
-----
Fifth(*) - ratio 3:2. Its offset is about +2 cents.
The Fifth implies the tonic. It is a very strong harmony when it is in tune. Try to not compromise here.
-----
Minor sixth - ratio 8/5. Its offset is about +13 cents.
This interval sounds good when in harmony. But I don't have a lot of experience with altered tunings using this interval.
-----
Major sixth - ratio 5:3. Its offset is about -16 cents.
This is used in Powerbender tuning on both the blow and draw plates and provides a very nice sounding interval. But -16 cents can sound pretty flat. Again, you choose as to whether you will use the interval or chord more than you want to keep the melody note in tune.
-----
Minor seventh - ratio 7:4. Its offset is about -30 cents.
This is the traditional sound of 7-Limit-Just Intonation tuning where in Standard Richter the 5 and 9 draw are tuned very flat. When in tune, playing any combination of draw holes together will imply the tonic note.
But -30 cents is too flat for melody notes to sound in tune. The usual compromise is to tune the 5 and 9 draw sharper and only play the 1-2-3-4 draw major chord excluding the 5.
-----
(*) A final note about Fifths, Fourths and Major Seconds (in standard Richter): Since these offsets are very close to ET - only within a few cents - you will not really have to compromise. But I suggest you focus on getting them accurately tuned; close isn't good enough! When these intervals are in harmony with the tonic, they will make that interval sound very very strong. But it has to be "bang-on" because the window of opportunity is small.
Even if you are only a fraction of a cent off, it's a missed opportunity to my ears...
-----
Are you new to tuning a diatonic harmonica? Here's a great place to start:
"What's the best tuning temperament for POWERBENDER?"
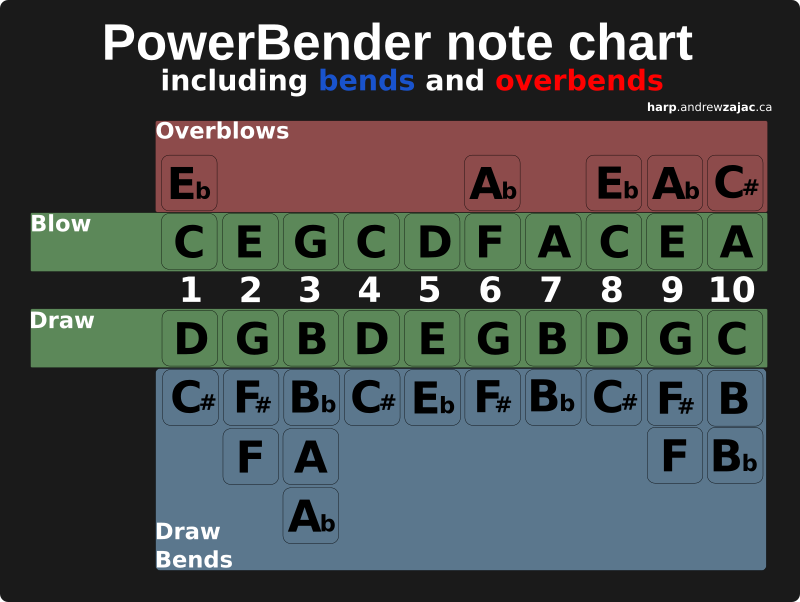
My favorite altered tuning is Brendan Power's Powerbender tuning.
To me, the most important feature of the diatonic harmonica is the sound of bent notes. Powerbender offers you powerful, juicy draw bends on all ten holes. There are no blow bends, nor are there any overdraws to play.
All of Powerbender's draw bends are dual-reed bends which means both reeds collaborate to make the sound. You get a much stronger and smoother sound than you get from single-reed bends like overblows and overdraws or half-valved bends.
PowerBender holes 1-2-3-4 are the same as Standard Richter. Ten reeds are re-tuned to provide the note layout.
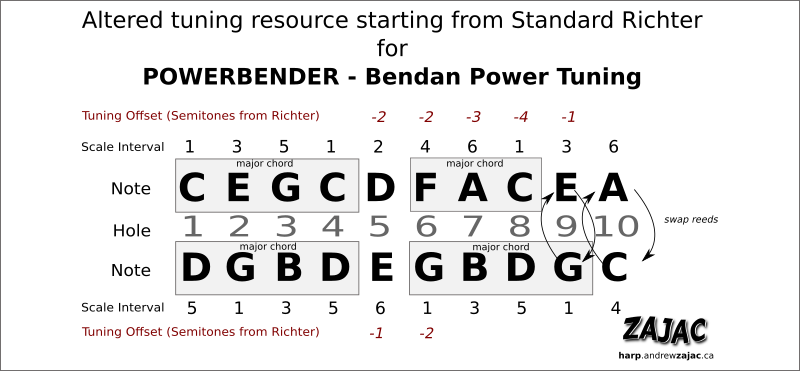
You can order pre-tuned Powerbender harps but sometimes the fastest and most economical way to go is to convert a Standard Richter harmonica. The conversion to Powerbender is a pretty big job. Some notes need to be lowered by three or four semitones.
Here is a visual aid to the modification:
These note changes can have an impact on how well the harp responds but this is nothing that can't be fixed with a little reed adjustment.
But since reed adjustment will impact tuning, where do you start? The best strategy is to make the coarse tuning adjustments before you do reed work.
Here is a sensible method for getting this done with the least amount of wasted time and effort:
Alteration checklist:
1- Swap blow/draw reeds 9 and 10.
2- Correct factory defects.
3- Perform coarse tuning adjustment. Lower pitches using BluTak or Solder. (See semitone offsets in red)
4- Perform other customizing and improvements including reed work.
5- Perform fine tuning. Identify Major Chords for Just or Compromise tuning. (See scale interval to help you achieve harmonic tuning.)
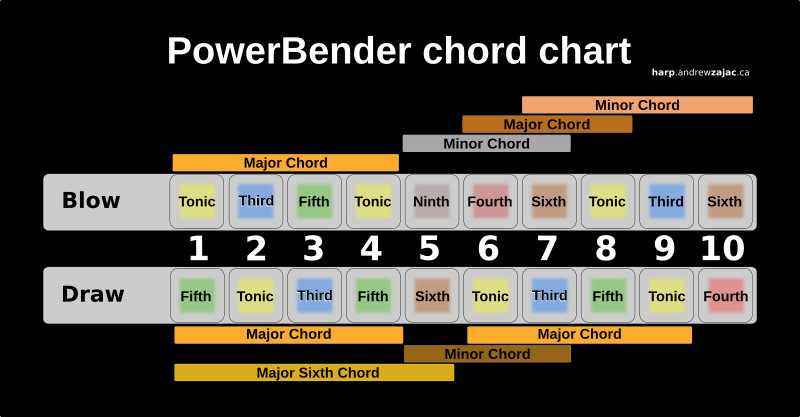
If you tune your instrument for the major chords, Powerbender layout offers you some new intervals (fourths and sixths) to deal with. These intervals are not part of Standard Richter tuning so you may have never had to tune them before. Thirds, Fifths and Sixths can make the harp sound very powerful when tuned in harmony.
But those notes can sound out of place as melody notes if you have sensitive ears and play in many different positions.
Should you even worry about temperament? Should you just tune everything to ET? It depends on your needs and preferences.
If you play in First, Second and Third positions almost exclusively you may benefit from tuning these intervals in harmony. If the melody notes of most off-the-shelf harmonica are too far out of tune for your ears, go for ET with Powerbender.
Final note: Brendan Power uses half-valving (or even extra reeds in his X-Reed harmonicas) to achieve chromaticism. I just don't connect with half-valving.
I prefer a strong connection with a responsive harp. I prefer playing the missing notes as overblows (there are no overdraws on Powerbender!).
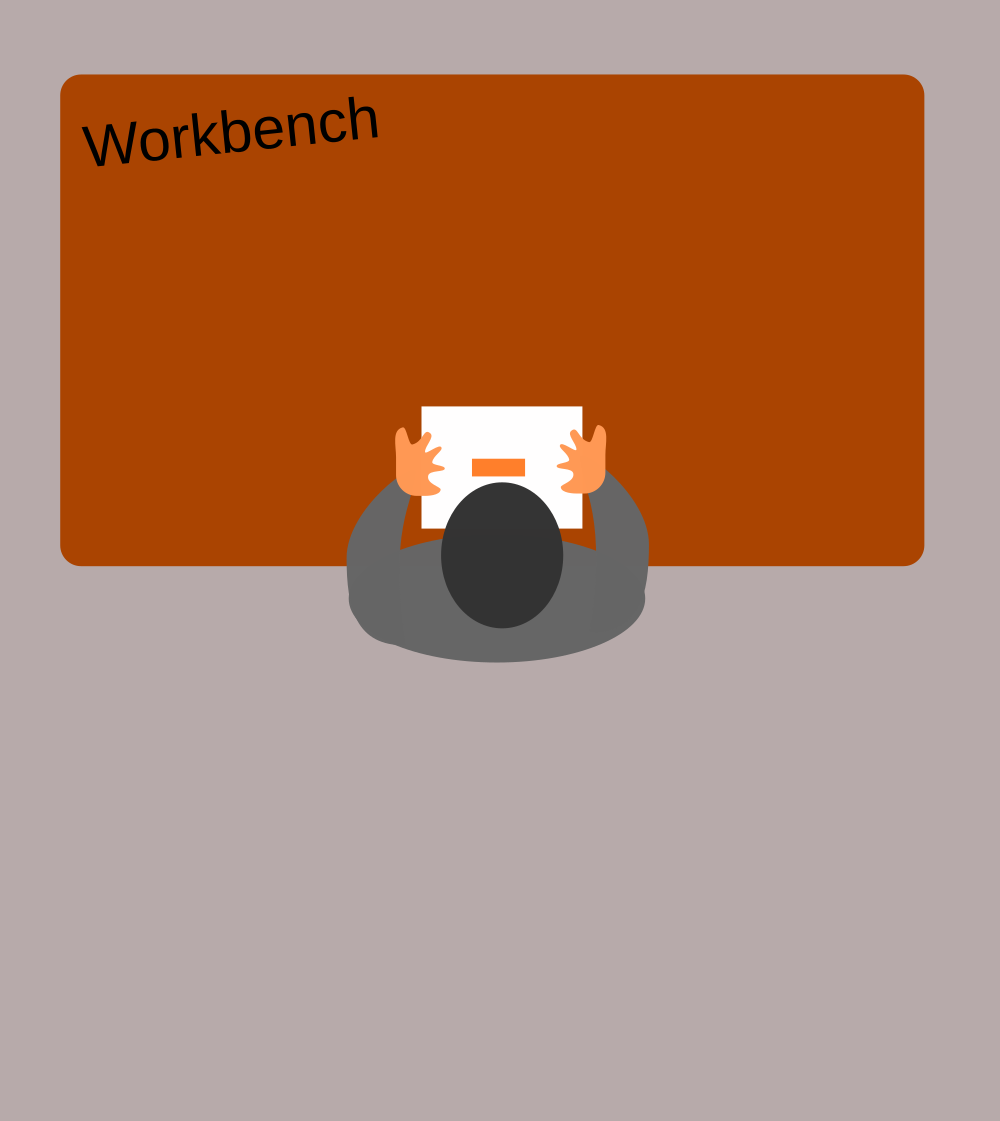
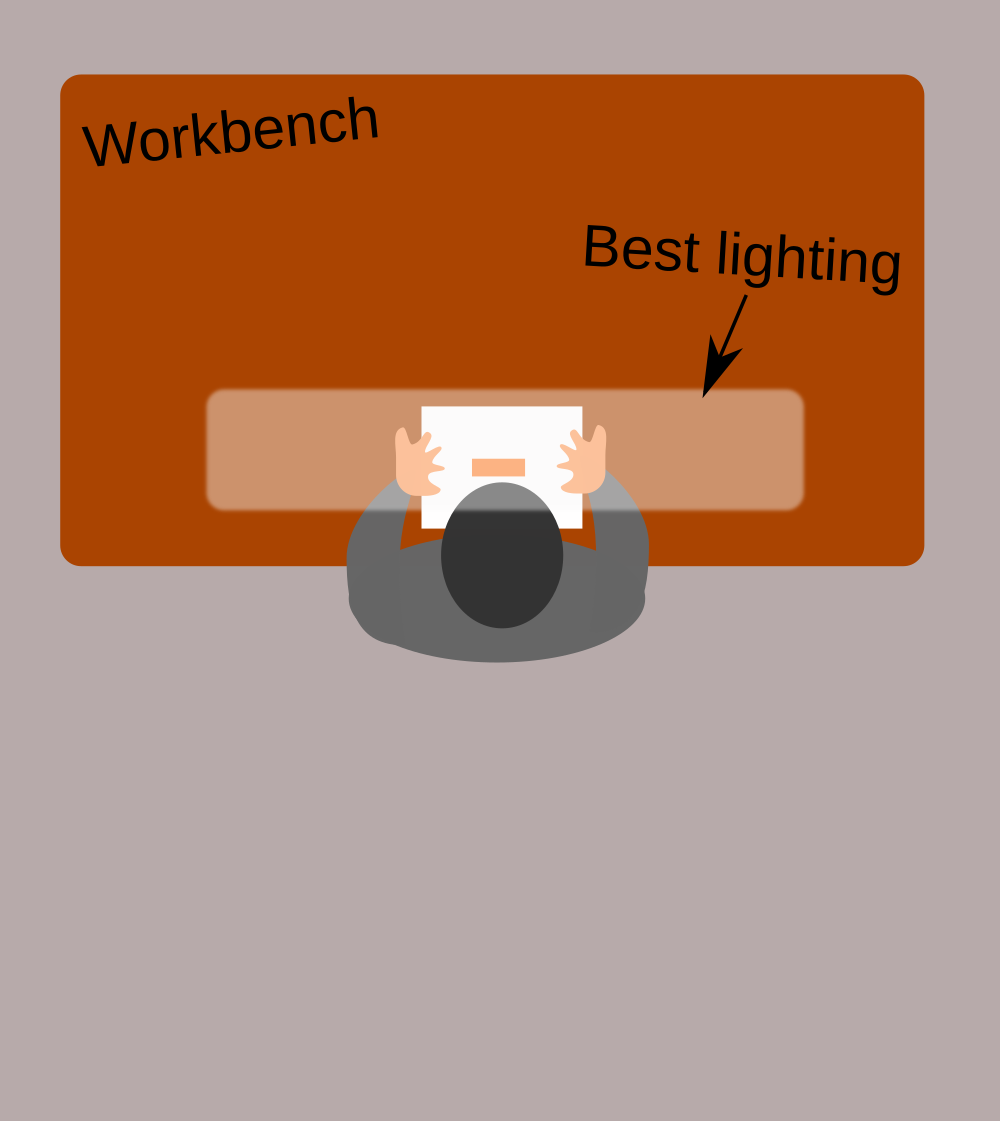
Are you having trouble seeing all the small details that are important to reed work, embossing and most of everything else? The trouble is likely how your work space is lit.
This is what my workbench looks like from above. This is me sitting in front of a white piece of paper with a reed plate on it:
Ideally, light should be coming from directly above, like this:
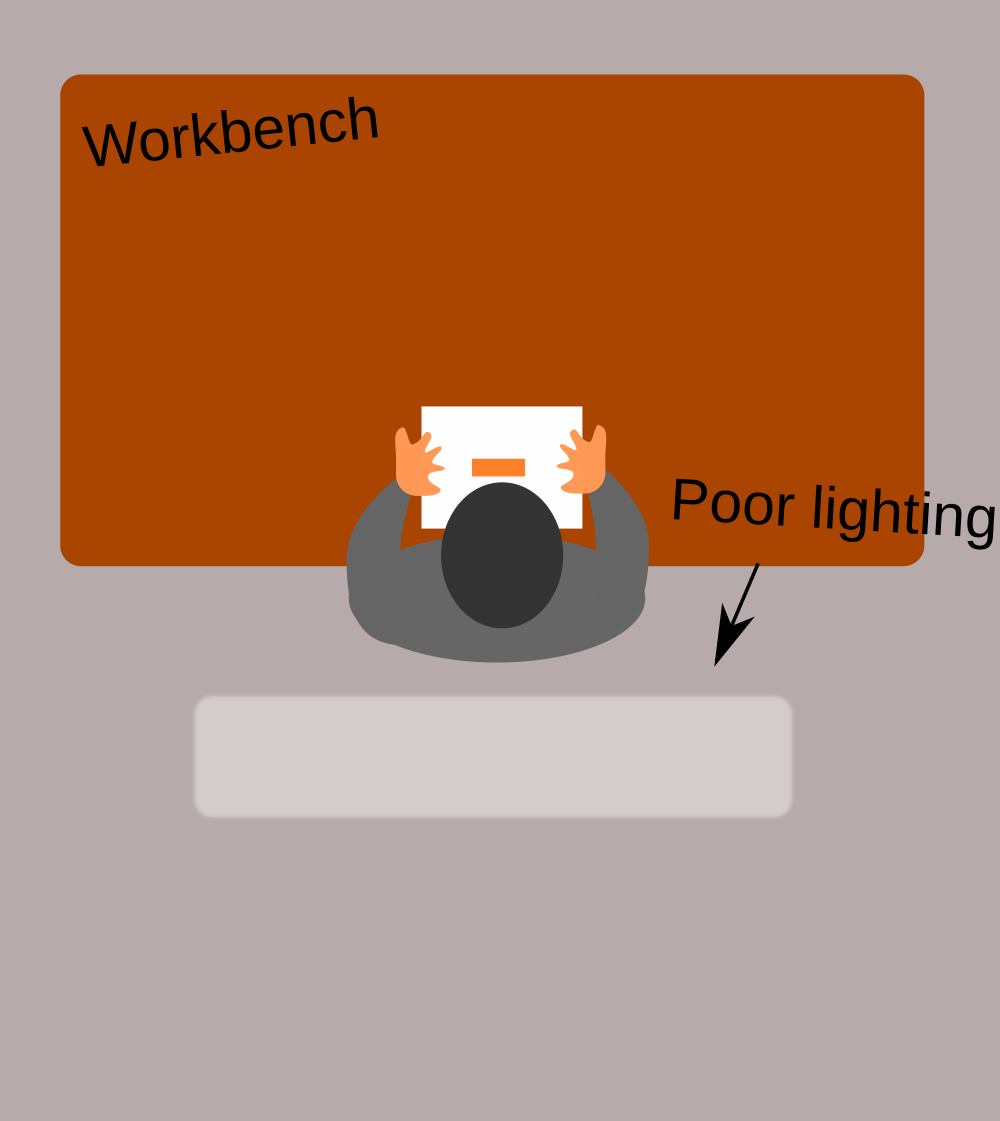
If you are having trouble seeing things, it's likely that your lighting is behind you or off to one side. You will always struggle to see what it going on like this:
Light and shadows help us see what's happening. A small detail like this can mean the difference between viewing the reed passing through the slot or seeing no detail at all. I hope this helps you avoid some frustration.
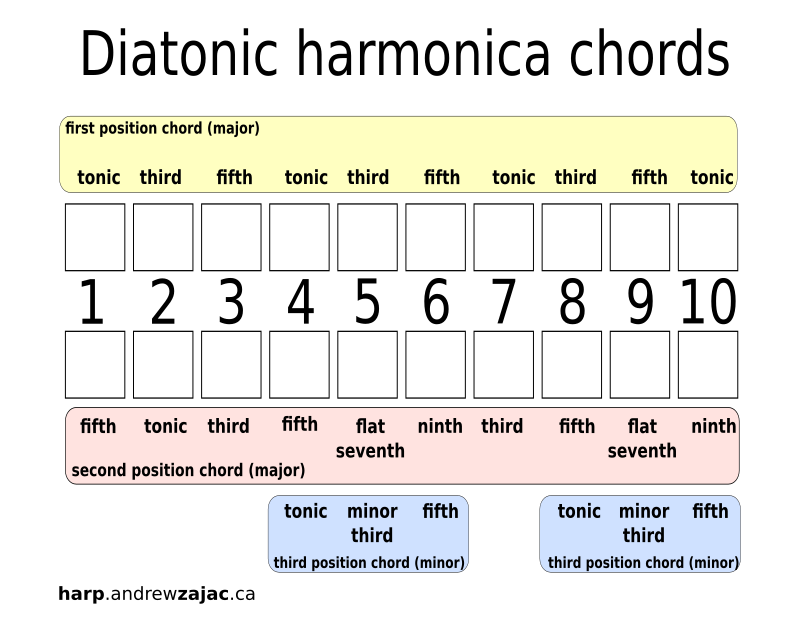
7 Limit Just Intonation is when all the notes of the draw plate are in harmony.
The recipe to achieve this is laid out as a table of offsets but you cannot tune a harp to be in harmony using only numbers. No tuner is accurate enough - not to mention because of our embouchure, we skew the offset when we play individual notes.
This video is pretty much an audio-only example of what 7-Limit Just Intonation tuning is.
7-Limit-Just-Intonation favors the major chords over tuning the single notes. Any three consecutive holes played on the blow plate will play a major chord. Any three consecutive notes played on the draw side will play major chord tones but anything above hole five will include the flat-seventh and/or ninth. When tuned to 7-limit-Just Intonation, these chord tones are in harmony and imply the tonic.
You can call it a harmonic, a difference tone or a combination tone. When the frequencies line up perfectly, the effect is that the sum is greater than its parts. You get a louder more powerful sound.
See my other videos on tuning - as well as my Premium video on tuning using an analog strobe tuner - to learn how to tune using your ears to help build accuracy.
I strongly recommend you obtain and use The F Tool to straighten both the blow and draw reed plates. These are fine harps, but they suffer a little more from the difficulties associated with mass production than a higher quality harp.
Version 3 includes over 9 hours worth of videos of which 2 hours and 30 minutes are Premium videos. Premium videos go into unprecedented details and show you topics that have never been shown before.
Learn to repair, upgrade or customize your own harmonicas to make each one of them a high-quality instrument.
A well-playing harmonica is a joy to play.
Many harmonicas require a lot of effort to play and it makes you feel like you are fighting with the instrument. That can leave you questioning your skills or thinking about giving up.
There is no reason playing harmonica should feel like work - it should be FUN!
On my USB drive you will find over 30 of my best YouTube videos teaching most customization and repair topics.
In addition to those popular videos, I created 15 new Premium videos that are only available on this USB drive. These videos go into unprecedented details and have best video and sound quality. I show you topics that have never been shown before.
All videos are organised and come with 50 pages of printed documents to which you can refer as you watch the videos. Charts and checklists are included.
Premium videos include:
- Advanced reed work: This method uses your eyes, ears and oral cavity to tell you how to shape the reeds. I reveal everything in this video.
- Tuning using an Analog Strobe Tuner: Nothing can beat an analog strobe tuner. Here's why.
- The secrets of finding and correcting hidden manufacturer defects before you even start working on a harp. Avoid unpleasant surprises and wasted time!
- Make an easy task of full-slot embossing and chamfering.
- Reed replacement two ways: With a rivet and with a screw. Take your pick!
...And many other things never before shown!
For those who want to spend as little time as possible working on their harps, I have a Quick-and-Dirty section which includes useful instructions on how to get surprisingly effective results FAST!
- The "Silver Bullet": how to make up to 90 per cent of harmonicas from the factory play louder, bend easier and have better tone.
- Five Minute Reed Work: What do you do when gapping doesn't work? You fix the reeds. Here's how.
- Gapping strategy: Here's how I gap any harp to get the same results every time.
- Tuning repair: Spend less time tuning by zeroing-in on the problem notes.
Support and updates:
With the purchase of these videos you get email support: Ask me anything!
I'm not done! I will continue to make new videos. I will also provide a method for you to get updates and access new videos as I make them.
---
Update number ONE was added on 2018-03-20:
Added videos:
- Use your mouth to guide Reed Work (Premium)
- 7 Limit Just Intonation
- The Flatness Tool™ instructions
- Reed Plate Claws™ instructions
- Answer to the most common customizing question
- To Tap or to Self-Tap?
Added Documentation
- Updated Reed Replacement information
- The Flatness Tool™ and Reed Plate Claws™ (Replaces F-tool and Comb Tool)
-Insight on why the BLOW plate is much easier to deal with than the DRAW plate
- Best lighting for reed work (and everything else)
- Altering Standard Richter to Powerbender
- Tuning offsets
- Gaskets are not the best way to make a harp airtight
- How many cents are there in a Hz?
---
Update number TWO was added on 2018-10-18:
Added videos:
- Chamfering (Premium)
- Upgrading a stock Special 20 comb (Premium)
- Roll (reed work) (Premium)
- Insights into the 7 Overdraw (Premium)
- Harmonica Customizing is Harmonica Rebuilding (YouTube)
- Easy way to support the blow reeds while tuning using a Hockey Stick (YouTube)
- Hohner Affiliated Customizer program at SPAH 2018 (YouTube)
Added Documentation
- Advanced Tuning: Written instructions on how to properly use a strobe tuner. A guide on how to buy a new or vintage strobe tuner.
- Chamfering guide.
- A method for testing/assessing a harmonica.
- An easy way to support the blow reeds while tuning.
---
Update number THREE was added on 2019-12-02:
This is a minor update that adds clarity and precision to previously published content.
A new video and new documents have been added to my Customizing videos on USB! This update includes one new video and four new documents. The tuning guide has been updated to be more clear.
This update is a 76 MB download. The files you get with this update will not serve you unless you have already gotten the USB videos and documents.
You can download and extract the update files to your computer. Documentation is provided as PDF files.
I have gotten fantastic feedback since I first released these videos, thanks! The contents of this update reflect the best and most frequent questions and feedback as well as upgrades to my tools.
2019-12-02
Added video:
- Using solder to lower the pitch of a reed (YouTube)
Added Documentation
- The Gapping Paradox
- In what order should you do things?
- Tune a harmonica using your ears and a simple chromatic tuner (updated from 2013)
- What happened to breath control in the 1960?
---
More to come! The science and art of harmonica customization continues to grow. Updates will continue this way in the long-term.
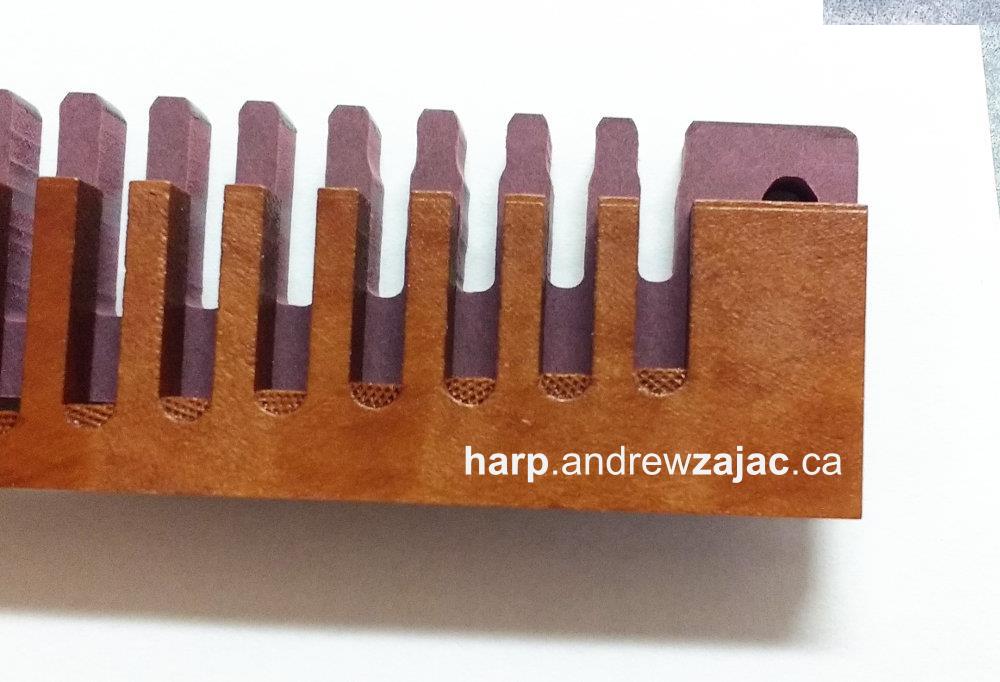
Hohner reed plates are "Long-slot" in keys up to and including C. Keys of Dd and higher are "Short-Slot" meaning the reeds are shorter.
Marine Band combs for these keys have shorted channels.
On the highest pitched harps, you may start to run into trouble getting the 10 blow half-step bend. It may sink into the full step bend offering you very little control. The trouble here is not only a matter of technique - although you do need to master fine motor control.
The trouble is mostly a matter of physics.
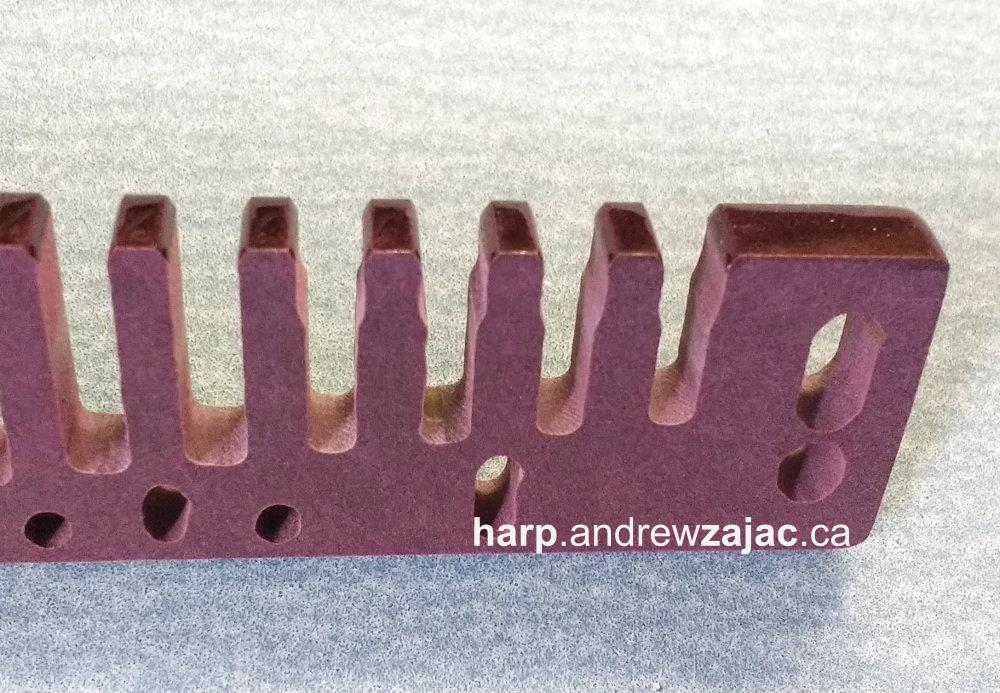
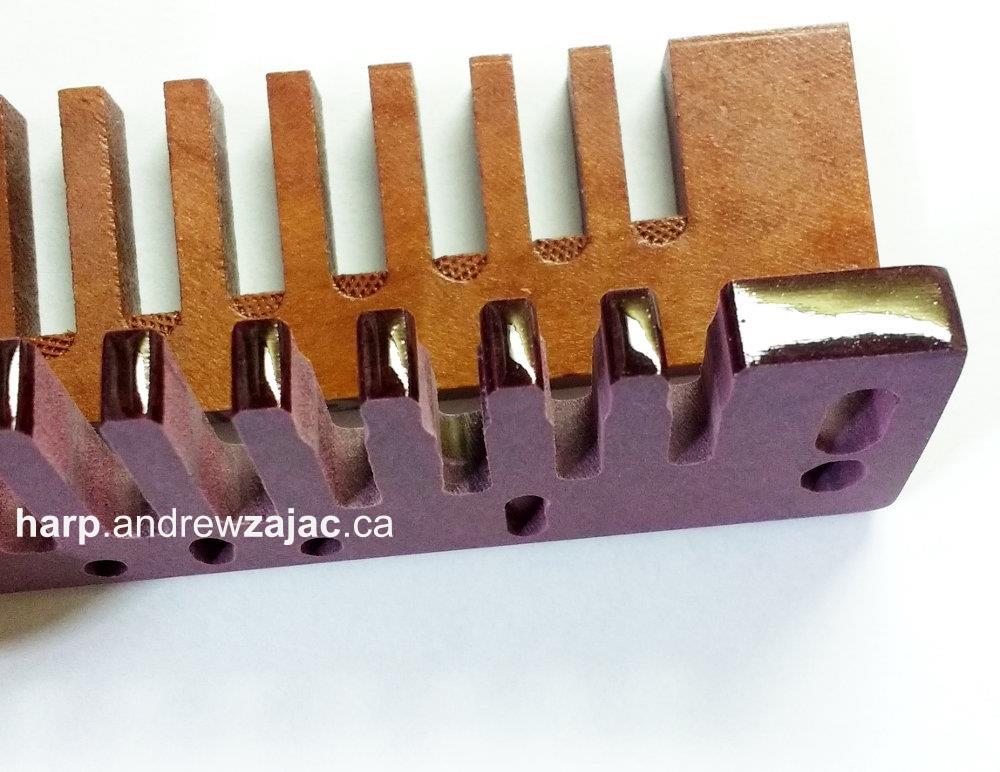
The acoustics of the reed chamber can interfere with the resonance of the 10-hole half step blow bend. Short-Slot Hohner Marine Band combs try to compensate for this. I've taken it a few steps further.
My solution has been to change the shape of the chamber so that the acoustics cooperate with the resonance you create as you play.
Until now, I have only offered this innovation in my custom harps.
Starting today, I will offer this design on all Short-Slot Hohner Marine Band and Golden Melody combs I make.
Here is a Factory Short-Slot Marine Band comb compared to my Short-Slot comb:
Have you every tried to give a reed a little more snap but nothing seemed to work? It plays "fine" (adequately) but everything you do to improve tone and response has no effect?
"What am I doing wrong?" you ask yourself.
If your harp is airtight and the reed has a decent shape, you should see results. If that's not the case, you have fallen victim to a subtle defect.
There are a few subtle defects that can cause you grief. The best way to deal with them is to learn how to spot them and correct them before they can affect your work.
Base centering is one of these subtle defects. The worst thing about this one is that the reed shows no clue there is anything wrong until you try to work on it: It plays adequately out of the box.
Once you master this technique, you can center the base of a reed in about 90 seconds.
Difficulty level: Advanced. Practice on an entire reed plate of a proper (scrap) harp. Shift the base of every reed in different directions to learn how to control where the base ends up when you are done.
Often, shifting it to one side will affect the reed curvature. Once the reed's base is centered, it's important to check and correct the reed shape. It's important to check and correct the reed base centering before you start to customize a harp to avoid undoing your hard-earned progress.
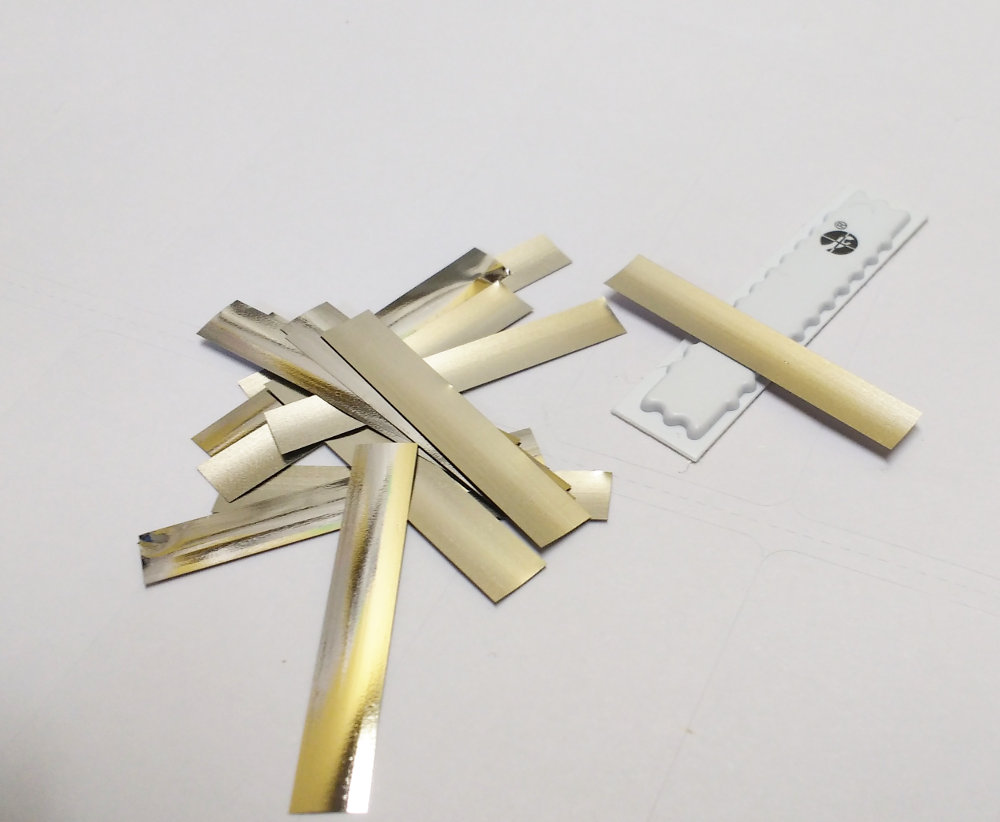
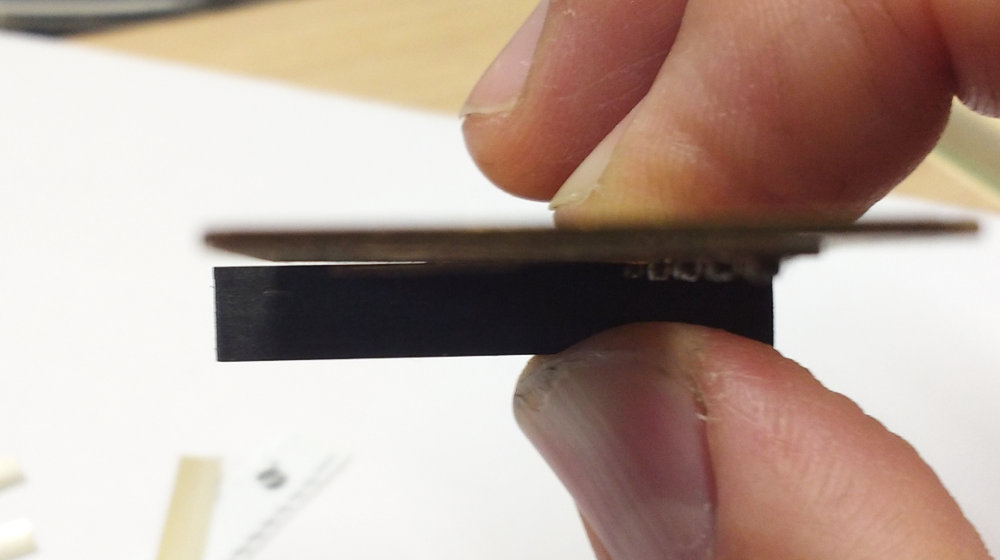
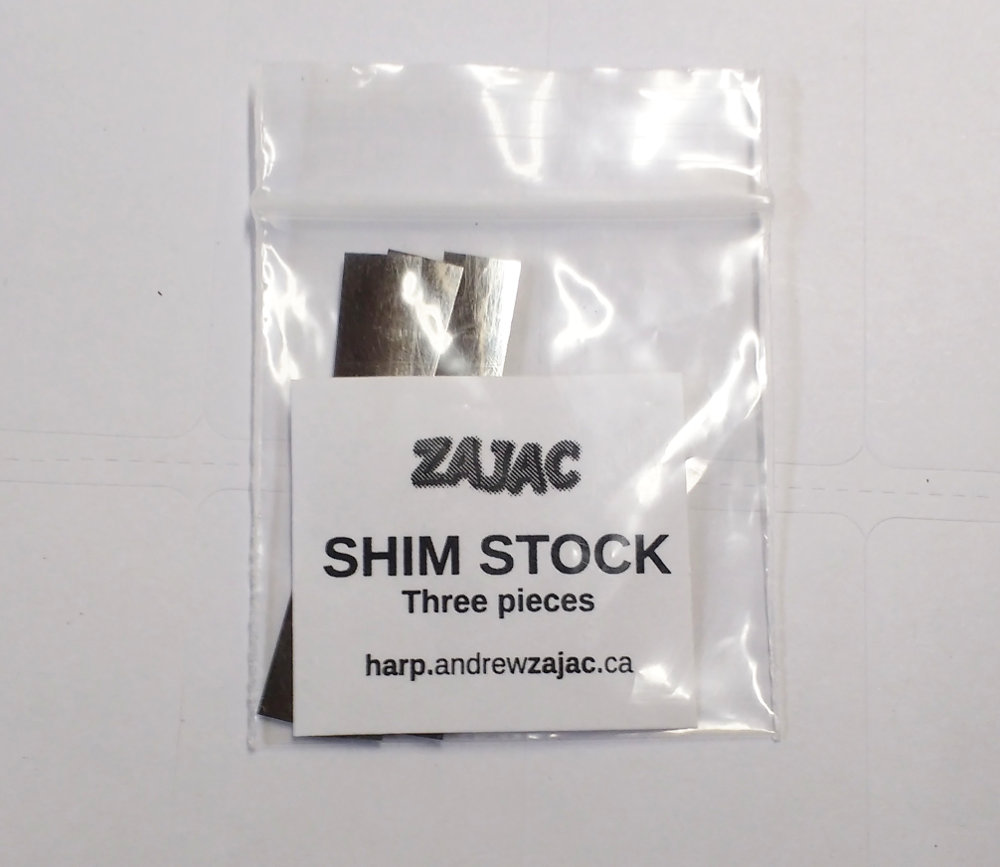
Shim stock is very useful to have on hand. Use it to de-burr after over-embossing or for measuring air leaks.
I tried sheets of tempered shim stock but ran into trouble. I can't cut small pieces easily without crumpling the edges and that defeats the purpose!
The very best shim stock is found inside Sensor-Matic anti-theft tags. You can find them on many products you buy off the shelf. Cut them open and you will find one or two pieces of one-thousandth of an inch tempered shim stock.
I bought a very large quantity of these exact same pieces of shim stock.
I strongly recommend you obtain and use The Flatness Tool™ and Reed Plate Claws™ to straighten both the blow and draw reed plates. These are fine harps, but they suffer a little more from the difficulties associated with mass production than a higher quality harp.
I recommend the ones with riveted reeds. There is no advantage to spot-welding reeds unless they are put on perfectly centred at the base from the factory. They are not. Riveted reeds can more easily be centred at the base than spot-welded ones.
I also found Easttop tuning to be quite imprecise. Tuning was plus or minus six cents! As such, it's not possible to lay out a meaningful tuning table of offsets for these harps.
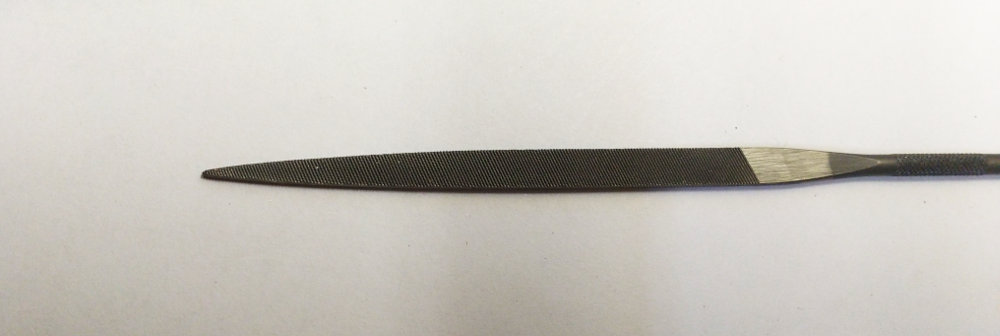
0-Cut is right on the margin between coarse and fine. It's perfect for removing brass with a light touch. It's coarse enough to have power but doesn't leave scratches and tracks on the reed.
Warding shape: Like a flat triangle with teeth on every side.
Raise or lower the pitch of a reed with the reed plate on or off the comb.
This file works on Brass, Stainless Steel and Phosphor Bronze reeds.
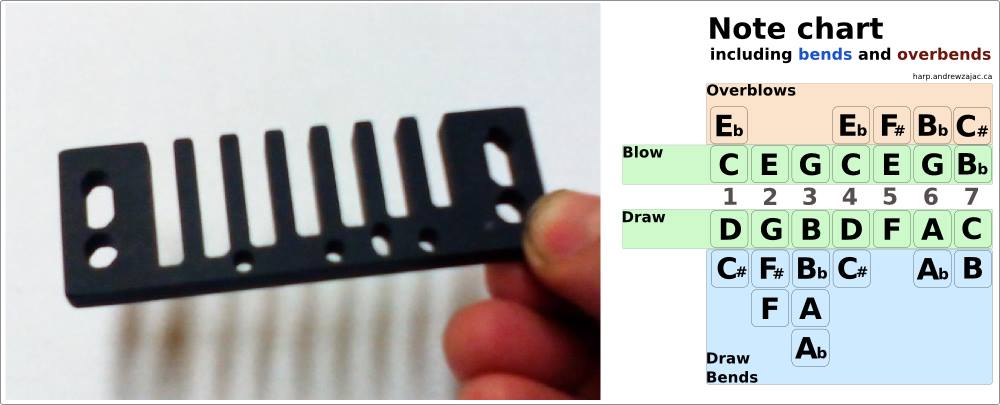
This is a custom comb I first made in February 2016
You can tune the 7 hole any way you like. Here, by lowering the 7 blow, we gain a draw bend. Add 7 blow into the top end blow chord and you get a minor seventh.
You can modify a standard cover plate to fit by trimming away the top end and doing a little folding and smoothing. Sorry, I don't have a photo of the finished product.